Monday, March 20, 2017

How our DIY kitchen renovation is holding up (1 1/2 years later!)

Hey all! Hope your weekend was great! We had so much fun -- family stayed with us most of last week through Sunday and it was fun to have a full house. 

My plan this morning was to take new photos for this post -- but then we had thunderstorms and it looked like nighttime outside. Too dark for pics! So this post is a combination of photos from recently and over the past couple of years -- if things don't match from photo to photo that's why. (And now of course as I write this the sun is coming out.) 😐

I finished our kitchen renovation a year and a half ago and I get a lot of questions about how things are holding up and how I'm liking changes I made. I wanted to follow up again to let you know specifics on some of the bigger changes I get asked about the most.

It's hard to pick a favorite thing in this kitchen...I'm just so pleased with all of it. But extending the island was one of my best decisions for sure. It is SO wonderful to have a larger space to prep/cook/bake on. And when we entertain we can now fit all of the food on the island 😊: 
How to extend a kitchen island

If I remember right I added about three feet to the island -- almost doubling the size. If you have the room I highly recommend doing this. I built on to the previous island and added wine storage, a spot to hang towels and other items, storage at the end, a spot for the microwave and room for a third stool on the other side.

One of the questions I get asked most is about our microwave in the island and if I like it after all this time: 
Two toned kitchen renovation

I LOVE IT. One of the best things I've done in the house, let alone the kitchen. I love that it's not the center of attention anymore (it used to hang above the stove). It took a little getting used to having it down lower, but now it's no big deal at all. My husband had a harder time getting adjusted than I did -- I loved it right off the bat. ;) 

We look through model homes all the time for fun and microwaves in base cabinets are definitely becoming a trend. A lot of them are actually lower than ours (but are nicer versions with a drawer): 
Microwave in kitchen island


We only updated one appliance when I remodeled the kitchen and this trash compactor in the island  is the only one that doesn't match the rest of the kitchen: 
Extended island with tons of storage

When we built I went with a combo of black and stainless appliances (wish I gone all stainless) and that's the last black one...and it's still doing just fine. I'm sure it will be years before we need to replace it with a stainless version. You can see more about that trash compactor and why it's my favorite appliance here

We splurged on a slide in range -- it had always been my dream to have the clean lines of this type of oven and the hood on the top: 
Heat resistant shiplap backsplash

We bought the KitchenAid slide in and I LOVE it. We've only had one small issue with it -- two times now the display has gone out. The oven works but you can't see what you're setting the temp to without the display. Thankfully it comes back pretty quick (within minutes) but it's annoying when it happens. 

I think the question I get more than any other project I've ever done (EVER!) is about the planked/shiplap backsplash. I used cement boards specifically because we had a slide in range and I wanted something that would be heat resistant. Plus it's a fraction of the cost of tile...and way easier to install. 

I didn't leave much of a gap between the boards because I knew I'd want to caulk between them anyway (who wants grease/food in there). It's sometimes hard to see the boards in pictures but they are much more obvious in person. They are virtually care-free -- splatters wipe right off. They look just like the day I installed them! The only change I may make is to paint the backsplash a lighter color sometime this year. You can see the details you need to know when installing a cement board backsplash here

Years ago I thought I may not like a stone countertop but I'm so glad I changed my mind. I love our counters and love the deep sink: 
 River White granite countertops

The counters were sealed well and we still haven't had any issues or had to reseal yet. It's supposed to hold up for years I believe. Often with granite you can see that the color changes around the sink over time and we haven't had any problems with that. I wasn't sure I'd like a shiny countertop surface but I immediately loved it when they installed them. The room needed that little bling! You can see which granite we went with and the company we used here

I like the look of a farmhouse sink but didn't think the cost was worth it -- especially when we loved our deep sink (the dark gray works perfectly in here). I have mentioned that you may want to reconsider a deeper undermount sink if you are tall. It took some time for me to get used to that (it dropped another 1 1/2 inches when undermounted) and I'm 5'9" and my husband is 5'11".

Another project I'm SO GLAD I tackled was taking down a few cabinets and then extending the other ones to the ceiling: 
Extending kitchen cabinets to the ceilings

I'll link to all the before photos at the end of this post but we used to have a few cabinets on the stove wall and I took those down. It opened up this room a ridiculous amount -- such a good move. If you are considering this I don't think you'll miss them:
Removing kitchen cabinets

DIY wood hood vent with slide in range

I built in the area around the fridge and later built the cabinets up to the ceiling. Having them go all the way up makes the whole kitchen feel so much more custom: 
How to paint kitchen cabinets with a perfect finish

And of course the biggest change was painting the cabinets! I am asked about these a ton too -- and they have held up SO WELL. I'm honestly a little surprised at how well. I did a follow up about them a month after I finished the kitchen and you're considering painting make sure to check that out. You MUST let them cure for a couple months before the finish is truly ready for wear and tear. 

I shared the whole process of how I painted them (and how they look like they were sprayed professionally) in this post. You do NOT have to sand the finish off of your cabinets if you want to paint! Of all the changes I made in this room, painting the cabinets was the most dramatic and the biggest bang for the buck. (I saved thousands doing them myself and they've held up better than some professional jobs I've seen.)

I did take away some storage in this room by taking down cabinets, but more than that was added back in the form of the upper cabinets (I use all of those baskets for seasonal kitchen items), the storage at the end of the island and a ton of space in the new window seat:
DIY bay window seat

I still get the heart eyes every single day when I walk in and see that seat. ;) 

The only project (so far!) that needs to be touched up is our kitchen table -- you can't see from photos but I need to repaint the top: 
White kitchen table with wood chairs

It gets a lot of use so I need to sand it down, do a couple more coats of paint and then put a protective finish on it. 

Whew!! I've said it before but it's so true -- living with this space for years before tackling it and doing the reno over nearly a year (I would do one project at a time) really helped us to make great decisions about how this room needed to be set up. It functions so beautifully -- I don't think I could ask for much more. I'm so very pleased with how well everything has held up so far. It's fared better than I had even hoped. 

I tried to touch on the projects that I get the most questions about, but if there's something I didn't mention that you are wondering about, please let me know! 

You can see the full reveal of the room with tons of before and after photos (my favorite!) here and I went into more detail about all of the sources and projects in this post


Tuesday, February 21, 2017

How to not kill your fiddle leaf plant

Hey there! Hope you had a lovely weekend, and perhaps a long one for some of you! 

I get asked about two things more than anything on the blog and social media -- the first is what's that paint color? (You can find all of our paint colors here.) The second is one I would never expect -- how do you keep your fiddle leaf plants alive? 

It seems many have struggled keeping these beauties from dying. The fiddle leaf fig has become incredibly popular over the past few years because of their big green leaves and pretty shape. I think they are the easiest plant to grow but I know many have had problems with them. If you have or are considering one of these, read on! 

I'll share some of our fiddles first, and then some tips. We have nine fiddles in our home and I've kept them all alive over the years. Most are thriving so I consider myself to be a fiddle leaf fig expert at this point. :) 

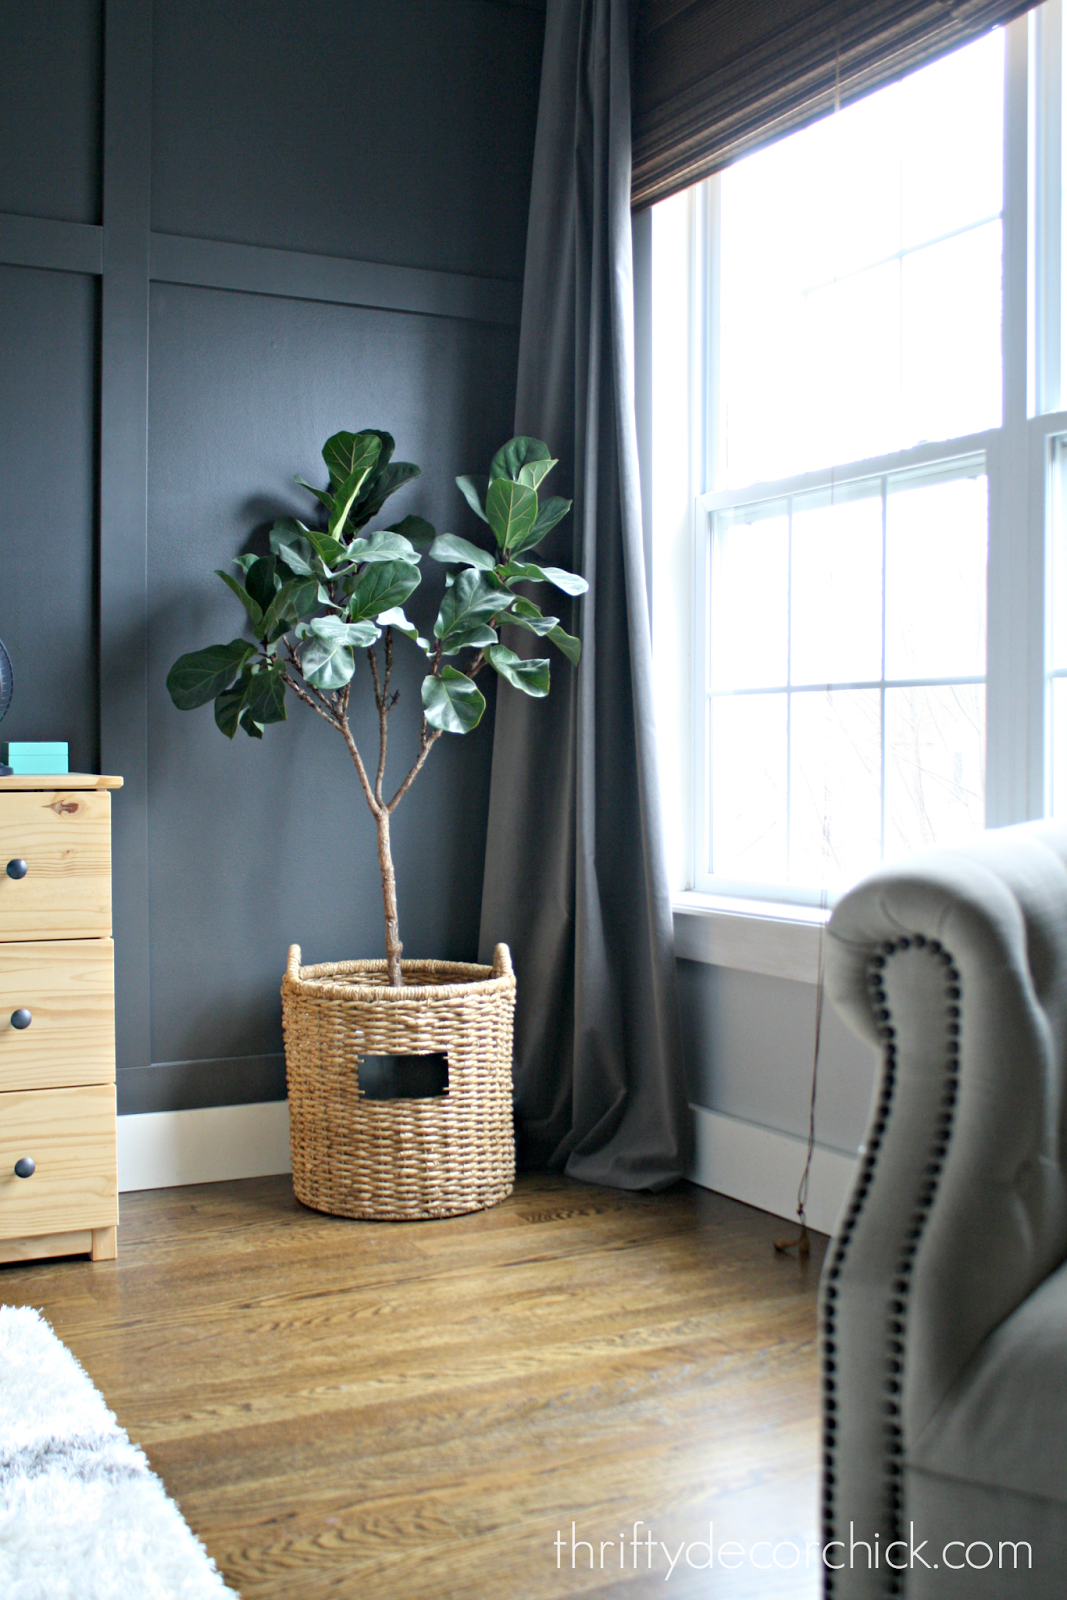
Some are doing better than others. My favorite, giant one was a killer find at our local nursery. This is how it looked shortly after we got it: 
healthy fiddle leaf plant

It was a $130 plant that I got for $30 because they said it was in such bad shape. At first I didn't see that at all, but then the leaves really started to fall. This is what it looks like now: 
fiddle leaf losing leaves

It's still doing well because a.) the leaves are now a beautiful, healthy, dark green and b.) it's still growing and sprouting like mad. It's grown nearly a foot (I moved that top line of art up years back so it's not a good indicator) and most of the leaves on it are very healthy. 

There's plenty of new growth on the bottom and at the top, but it's not done so well in the middle. I'll explain why it's especially bare right now at the end of the post. 

When I added the fiddle to our new loft space in the early fall last year it was much fuller: 
loft craft room and office

It's been growing well and the leaves are getting huge, but it lost quite a few leaves at first: 
How to fix brown or yellow leaves on fiddle leaf

I'll go into more detail on that one too. :)

But most, and theses are the ones I ignore the most (remember that!), are doing incredibly well! Our master bedroom fiddle is a slow grower but has healthy leaves that are a lovely green:
how to keep fiddle leaf plant alive

So pretty! This one is in our master as well and has grown at least a foot in just a year!:
fiddle leaf plant tips

I should have turned it (and need to) so you could see the size of the leaves on that one. It leans that way to get to the direct sun coming in through our bathroom window. 

My pride and joy is our master bathroom -- it was just a little guy a little over a year ago:
how to not kill the fiddle leaf plant

Isn't that crazy? It's HUGE. 

Our family room fig started out as a little bitty baby (right side of pic):
dark gray fireplace

Now look at him! 😍
tips on how to grow fiddle leaf

(See the end of the post for why the leaves turn yellow.) 

I found this small leaf fiddle at a big discount at the nursery as well: 
small leaf fiddle fig

They said he was doing bad and again, I didn't see it at first. 

He did struggle a little but now has grown quite a bit and is filling in a ton: 
small leaf fiddle plant

So here is my advice for some common issues with fiddles: 

BROWN LEAVES:  I think this is the most common problem I hear! These are tricky because most people think brown crusty leaves mean the plant needs water. Nine times out of ten it's the opposite -- brown leaves are a sign of too much water: 
brown leaves on fiddle leaf

Most of my plants have leaves like this -- usually from overwatering at the place I purchased them. Sometimes if the overwatering stops they will just stay like that for a very long time so I usually break off the brown parts (just don't tear the green part of the leaf) so the plant looks a little better. If the watering continues the leaves will fall off. I think this is the number one reason why so many die.

WATERING:  I only water our fiddles once every two weeks. You just need to watch the plant -- if it's really droopy you know it needs water, but it's very, very rare that mine ever get to that point. 

Keep in mind, if your pot is smaller you will need to water more often. If you have a lot of brown leaves, consider repotting to a larger pot and watering less. 

BARE BRANCHES:  If leaves fall off the branches they will look dead...they're probably not. Just leave it alone and new growth will appear again: 
empty branches on fiddle leaf

I will say, once mine lose leaves at the bottom and middle, it's very rare that they bloom new leaves again there. 

Our huge plant is getting some new growth at the bottom: 
cats peeing in plants
But again, for my taller plants that's rare. Side note -- Nerf bullets. I told you I find them everywhere. Secondly, if you have cats that occasionally pee in plants, rocks work wonders. They don't like stepping on them. You can find them at the dollar store. (Yes she has clean litter, yes she is healthy, yes sometimes she's just a butt and wants to pee in plants.)

LIGHT IS EVERYTHING:  I hear from so many that growing these plants is hard -- but I've found them to be the easiest plant by far. This is because they really need very little -- water every week or two and really great light. That's it! I promise. 

My best plants are in full, direct sunlight from half of the day to all day: 
healthy fiddle leaf care

The ones that struggle more don't get direct light. They will love you forever and be so happy if you put them in full sun. They LOVE it. If you're plant is not growing, it needs more sun. 

Also, if you have yellow leaves (you can see a couple on the plant by our back door), it means that leaf specifically isn't getting enough sun. Often I see this on the lower leaves because the upper ones block them. Sometimes there's not much you can do about that and that can lead to the more sparse branches. 

Now I do my best to turn our fiddles every month so they get full sun throughout. 

REPLANTING OR NOT:  When I bring a fiddle home, most of the time I don't replant it. I keep it in it's original planter and put a plastic water tray at the bottom. If the plant isn't doing well I may put it in a bigger pot, but some of mine that are absolutely thriving have been in the same planter they came in for years. 

You don't have to replant them, but if you are getting brown leaves and want to water less, go ahead and put them in something bigger. Once they get huge, you'll want to replant to something bigger. 

DON'T GIVE UP:  With full sun and little water, these babies thrive. I don't fertilize them, I don't prune them. I don't drag them outside or to the shower to water them (some do and have great success!). I forget about them for the most part and they seem to love that. 

Keep in mind they will go dormant during the winter. So they look their worst right now. Even so, ours are still growing new leaves, just not as fast as usual: 

fiddle leaf new growth

You'll need to be patient with them during these months as they pull back and slow down. :) 

WHERE TO BUY:  I get asked this a lot! Your local nursery will most likely have them. When I say nursery I mean a location with just plants -- if they carry indoor plants. I find they are the most expensive there though. If you find them, keep an eye out for one with damaged leaves and offer to take it off their hands for a discount. 

I used to find them at IKEA but it's been a couple years since I've seen them there. Now the best place I've found is Home Depot -- they usually have them in stock when I stop in. I've also heard Lowe's has started carrying them. I've purchased most of mine at Home Depot for $9 and that's a great deal for their size! 

I've heard some have had luck buying on Amazon, but the one I got there came and was ridiculously small. I mean, barely one tiny leaf so it was just annoying for the price. AND it died within a couple weeks. 

Have you had luck with these beauties? They are by far my favorite house plant, I adore them. They're awesome in decor because of their large leaves and fuller shape. 

If you have any additional questions I'll do my best to answer them!   

Here's an image to pin for later: 
Easy tips for growing fiddle leaf plants


Sunday, February 19, 2017

Pretty ways to organize everyday items

Hello there! Sorry for the late post today -- we thought we had a sick kiddo on our hands but after a doctor appointment all is well. :) 

I always feel like organizing this time of year and it last for a few months. The older I get, the less stuff we have and the longer we live here...I feel more and more organized. It's taken awhile! But organization doesn't always mean hiding things away into containers behind closed doors. The things we reach for the most can look good out in the open too! 

I thought I'd share a few examples of how I do that with items that fit seamlessly into our decor. It's easy to go overboard with tchotchkes so I chose to keep things out that I know we use every day. Like our commonly cooking utensils by the stove:  
Cute ways to organize in the kitchen

I found this little container at HomeGoods -- it came with a lid. Of course we have a lot of other utensils in a drawer nearby too, but these are what we grab 90 percent of the time.

I first shared these jars with you seven years ago when I showed you how to make easy chalkboard labels for them:
Kitchen baking storage

I've since changed out the Cheerios (that we used to go through super quick at the time for the Bub, sniff!) for baking needs. We keep flour, sugar and powdered sugar in our containers. Our friends laugh that we keep that much powdered sugar but we use them to make our favorite margaritas. ;) 

My absolute favorite zone for cute organization in our kitchen is our wood and metal shelf -- this thing is our hub every day and I've been able to organize quite a few everyday items in a cute way: 
Wood and metal shelf for kitchen organization

I keep our mail in the basket, cat and dog food (and treats!) in the white containers, odds and ends for the animals go in the copper bowl and our smaller office supply items go in the metal basket. I also keep our extra kitchen towels in the fabric bin at the top. 

This spot really does work overtime for us and I love that we can keep items that usually clutter up a kitchen stored away. 

I used to legit have a problem with magazines. For real, I would buy them constantly and hold onto them forever. Over the years I've moved past that and I can't even tell you how nice it is! ALL of our magazines go in this wood container (I think I got it from Target):
organizing magazines

If you've seen my past posts about my beloved magazines you know this is pretty big for me. ;) I give myself this much space -- if it starts getting too full it's time to purge. I like having them out so I can actually see them and remind myself to look through them, but they aren't super obvious or laying on the coffee table. (And they help to hide the subwoofer a bit!)

I use trays all over the house to corral little items. I told you about the tray on our kitchen island here and how it's our little station with items we reach for every day. This one sits on the desk in our office and has all of the supplies we need day to day: 
trays for organizing small stuff

That's one sad looking plant! 😆

I think my absolute favorite way to organize in our office/craft room is this DIY craft caddy I made a couple years ago using dollar store pails: 
DIY turning craft caddy

We reach for that nearly every day! I don't mind having craft items out if they're organized and cute. I really think that is the stuff that makes a house a home. :)

For years now I've organized our son's markers, chalk and paints in this caddy I got on clearance and painted: 
DIY rolling craft caddy

I gotta say, adding the wheels on the bottom was a brilliant move. ;) It's so easy to wheel it to the kitchen table or wherever we need it. 

I think bathrooms are another room that have random stuff that has the potential to look cute. Our son's bathroom doesn't have much storage so I put all of his random stuff like brushes, washcloths and toothpaste in this small basket: 
simple ways to organize everyday items

And I keep my bath supplies looking cute on our tub with a small tray and simple glass containers: 
pretty bathroom storage

I think bath items look especially pretty behind glass -- cotton balls, soap and bath salts all look like decor while staying organized. I hope to add more of those when we redo our master bathroom someday. 

These are just a few ways I've done this around our house! If you reach for it every day it can look good while staying organized. Do you have a favorite way to store everyday items in a pretty way? I'd love to hear about them! My goal for our home is always to be super functional, but I promise you it can be both that and look good too. :)