Friday, March 31, 2017

Big bathroom renovation progress!

Hey all! I'm excited so many of you are taking advantage of the free Mrs. Meyer's cleaning set I shared earlier this week. If you missed it, head on over and take a look. It's only good through Tuesday so get it while you can. 

I'm thrilled with the progress on the upstairs bathroom this week! We weren't planning on moving forward on it quite so quick, but the contractors came over to give us a quote and then had some days available so we went ahead. 

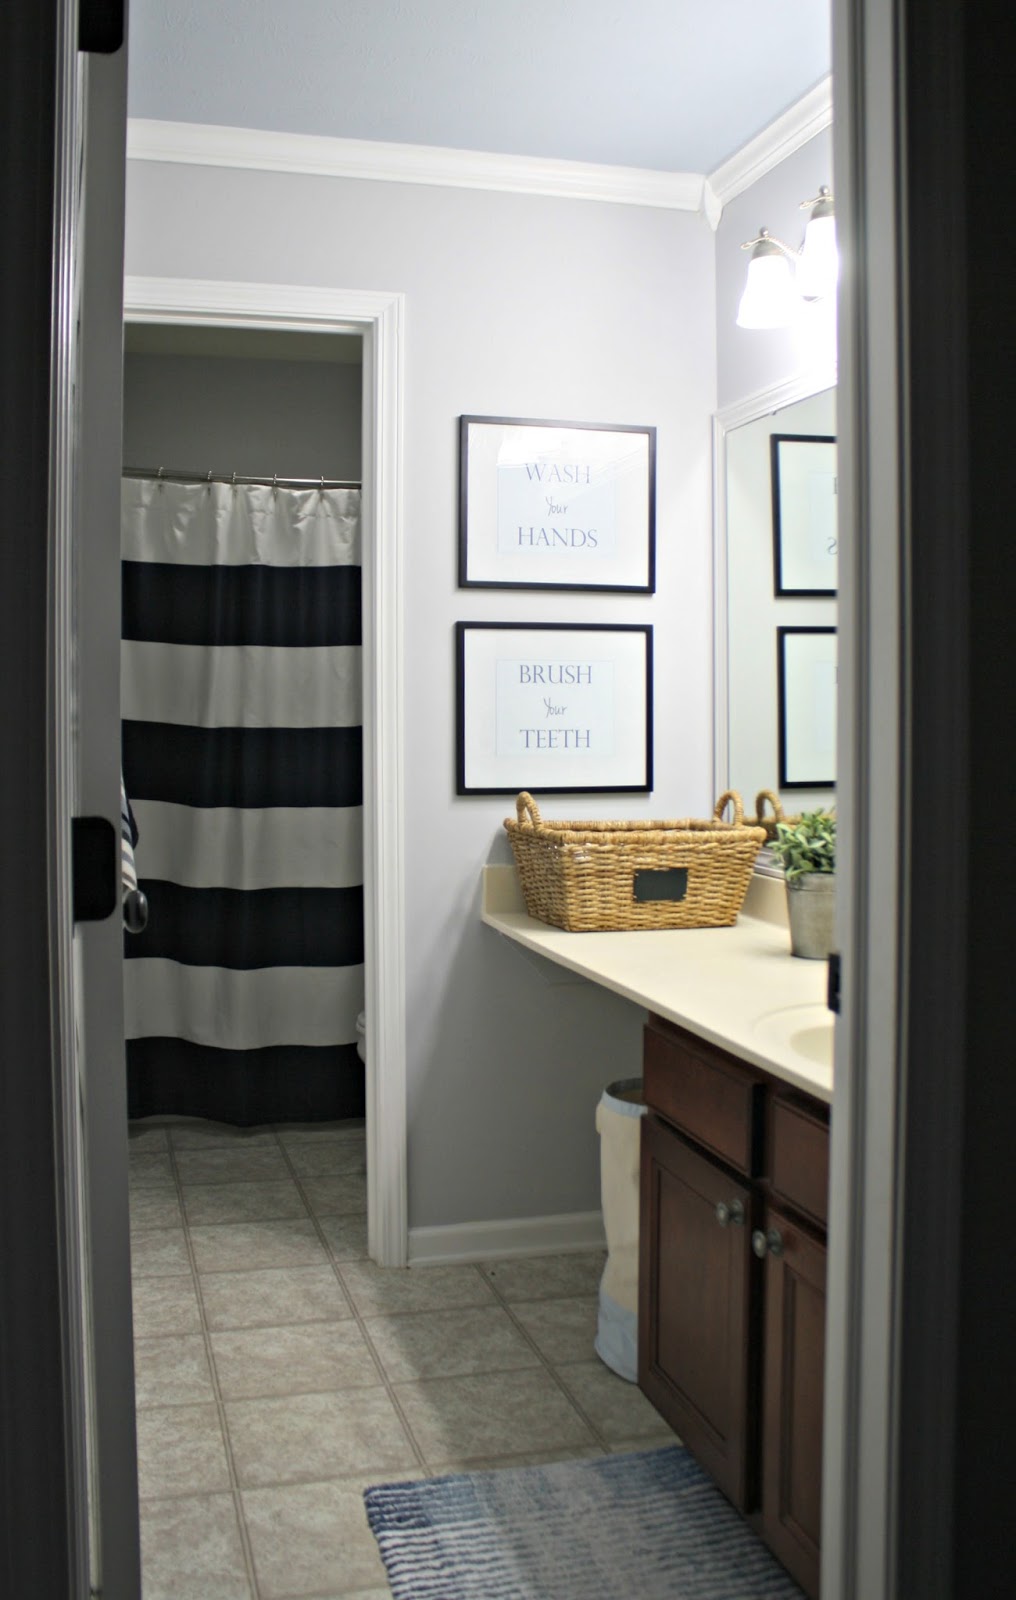
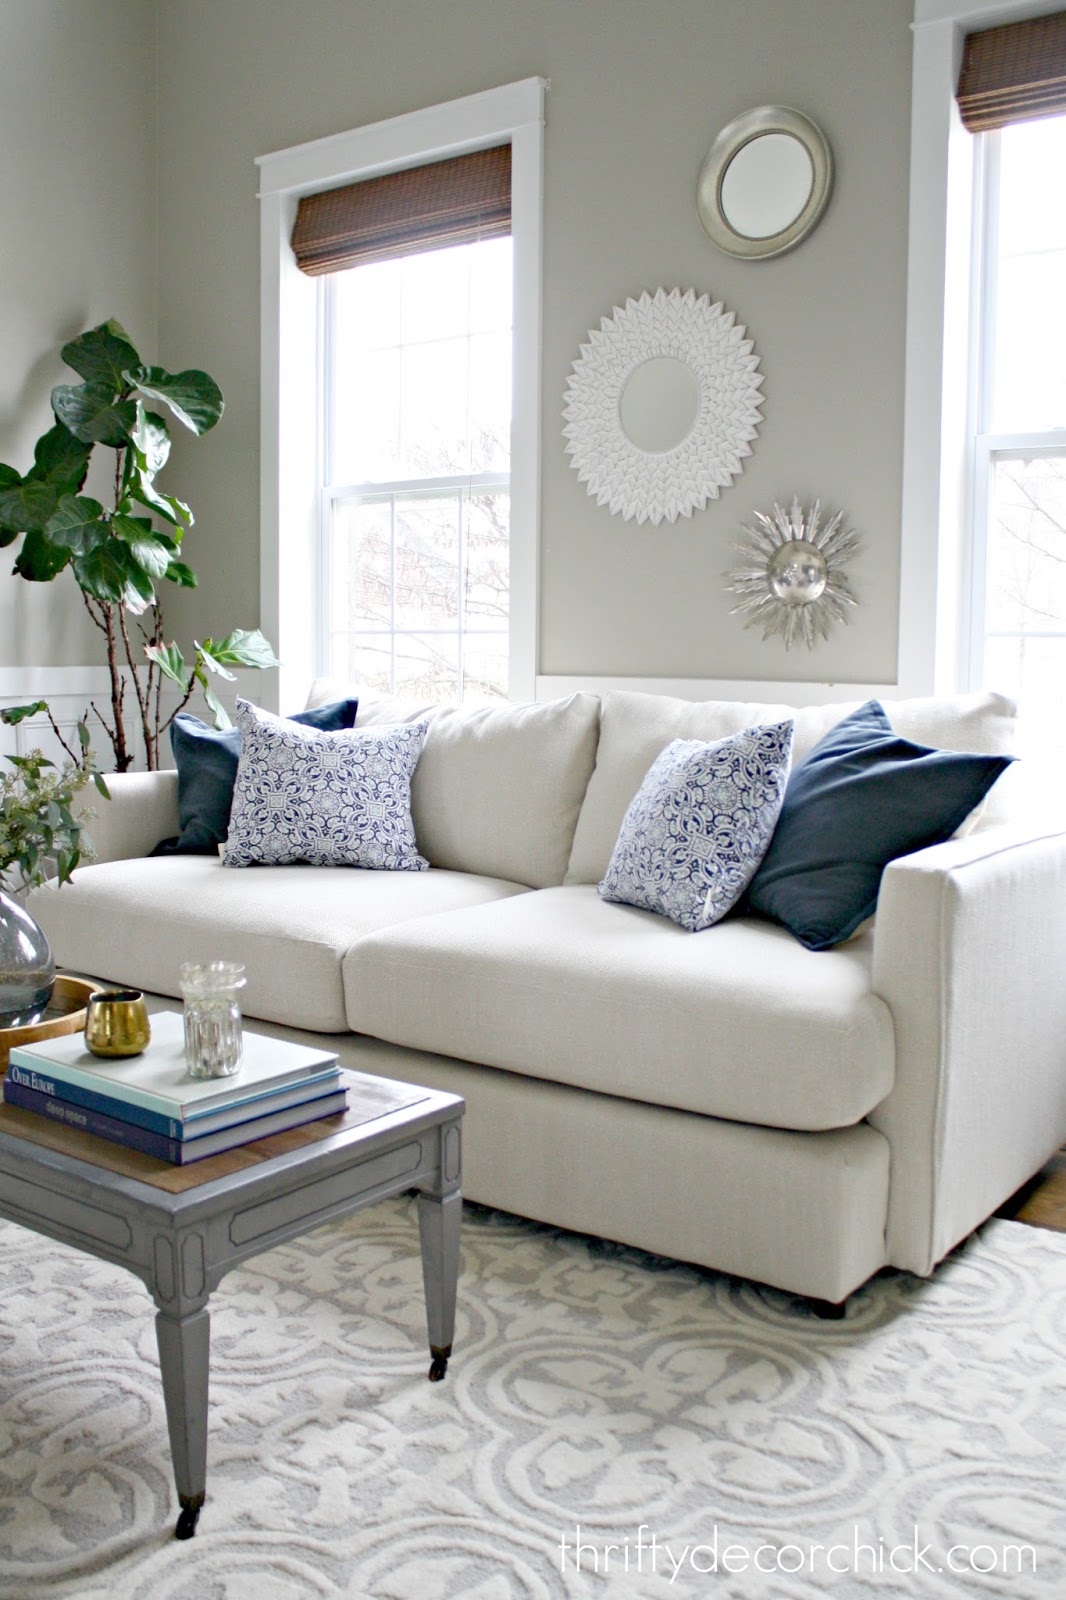
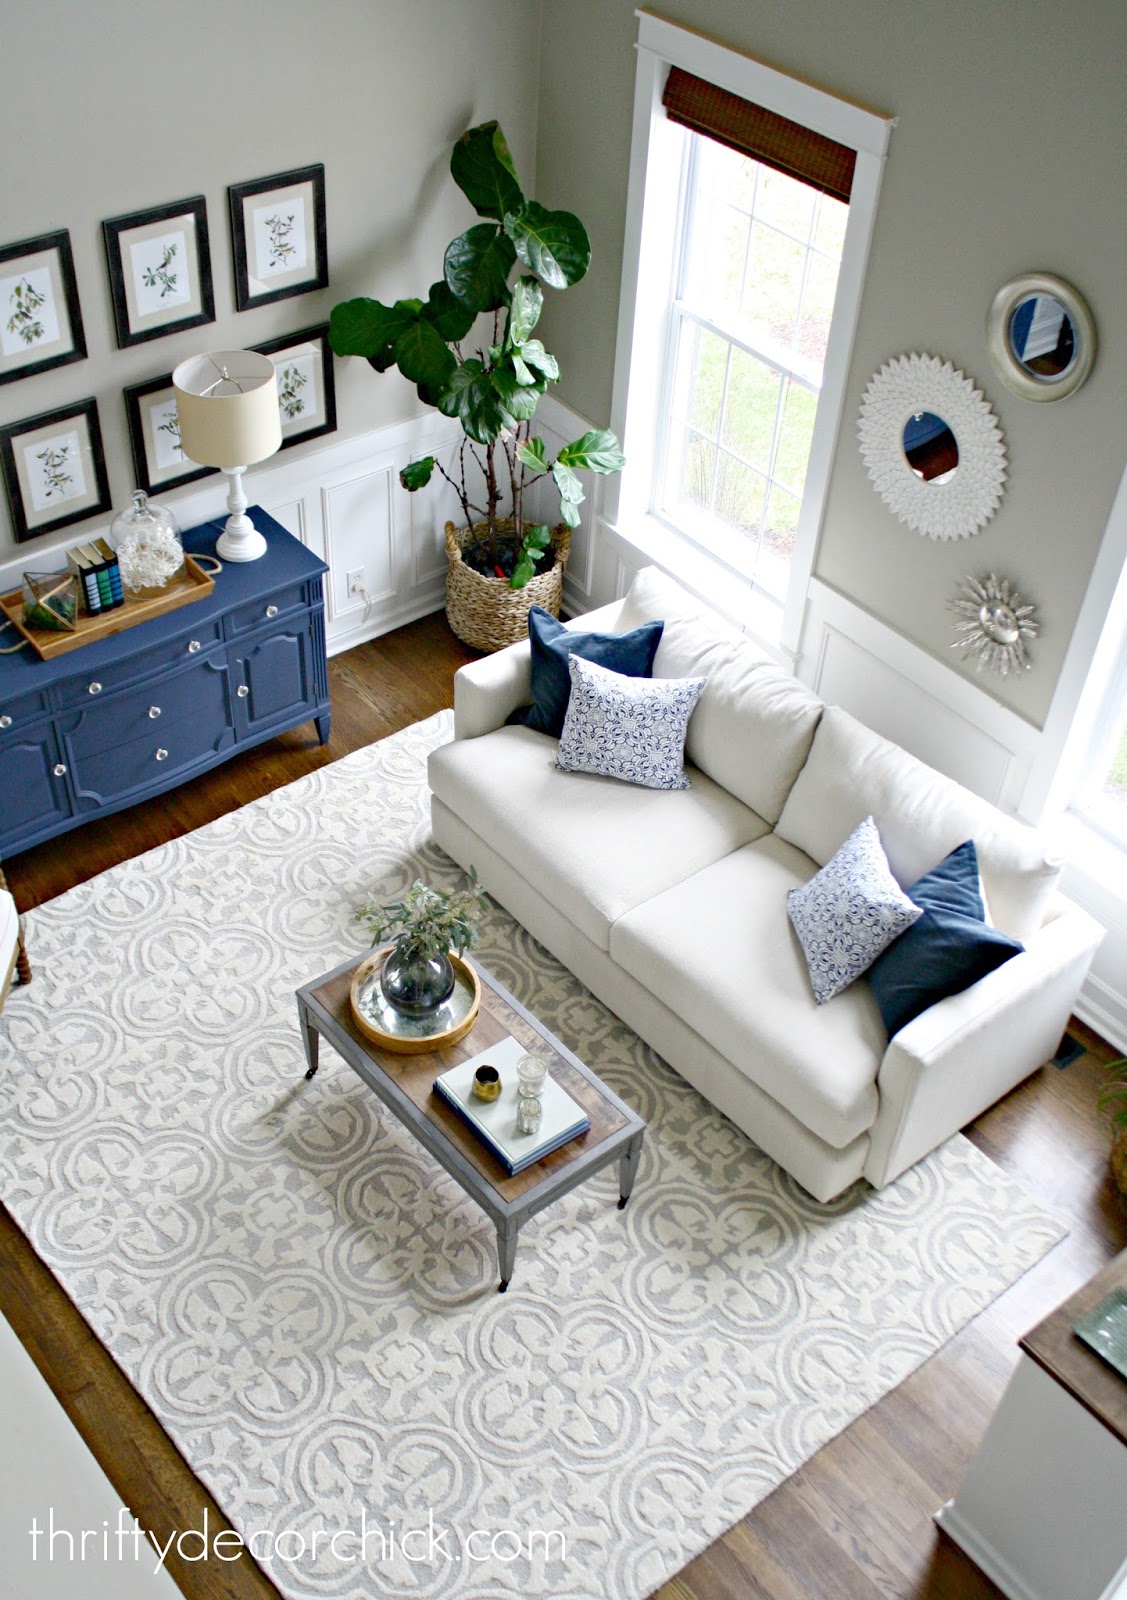
Here's a reminder of where we started: 
Gray and blue boy's bathroom

I did a very inexpensive bathroom makeover with paint and a few new accessories last year. Before it was bright yellow from when our boy was born ten years ago. :) 

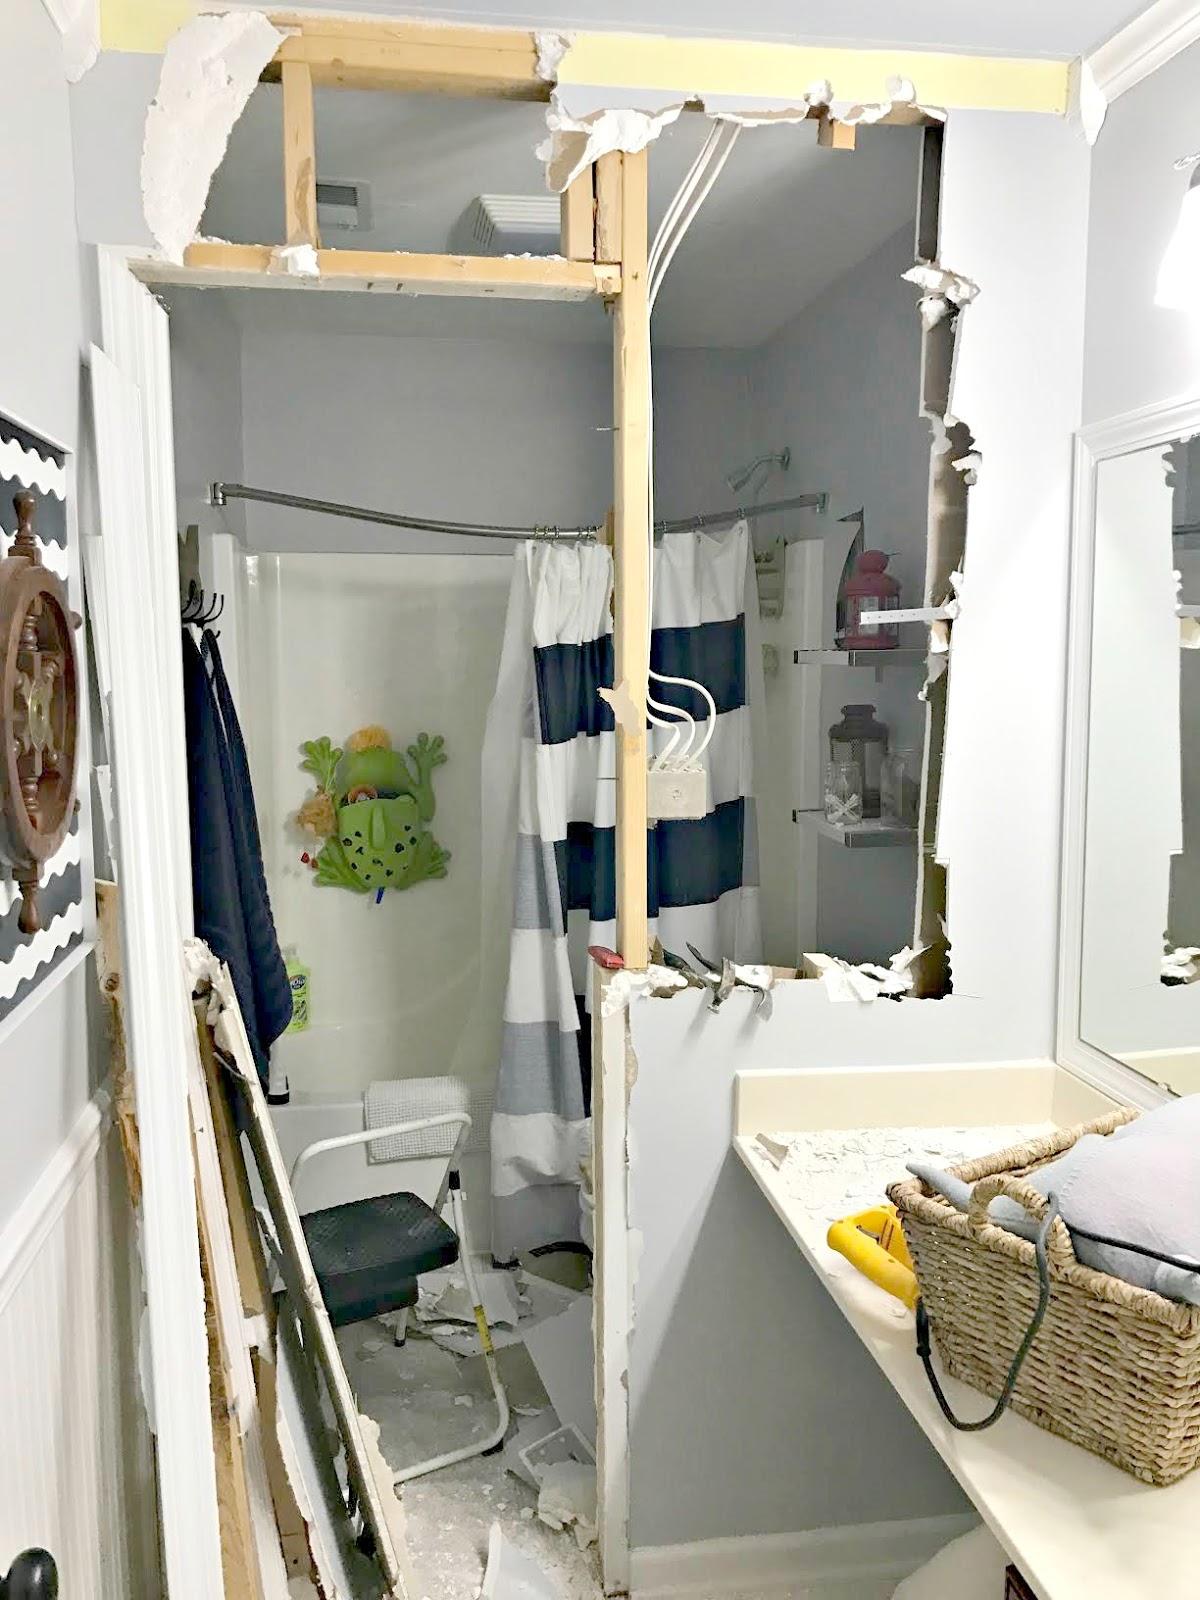
I've wanted to take that wall between the rooms down for years and have had the makeover plan in my mind all that time. I got a wild hair a couple weeks ago and just started knocking the wall down
How to remove drywall and studs

FUN times! It really was...I was so happy to start this. 

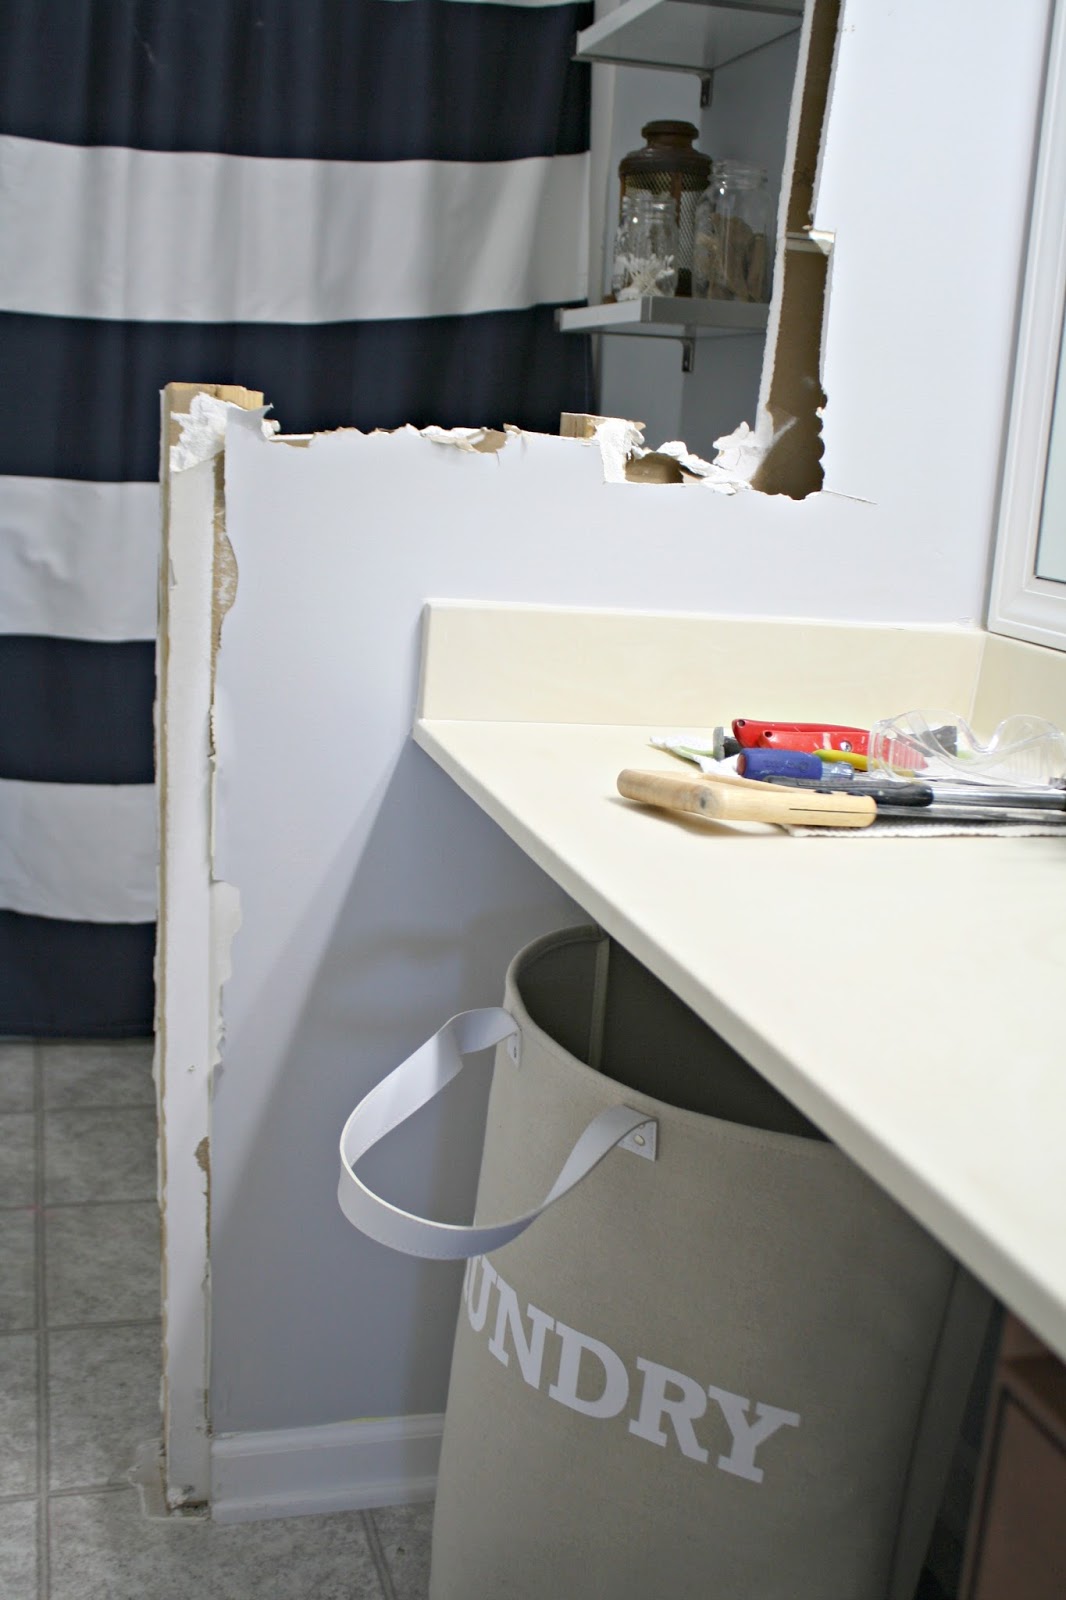
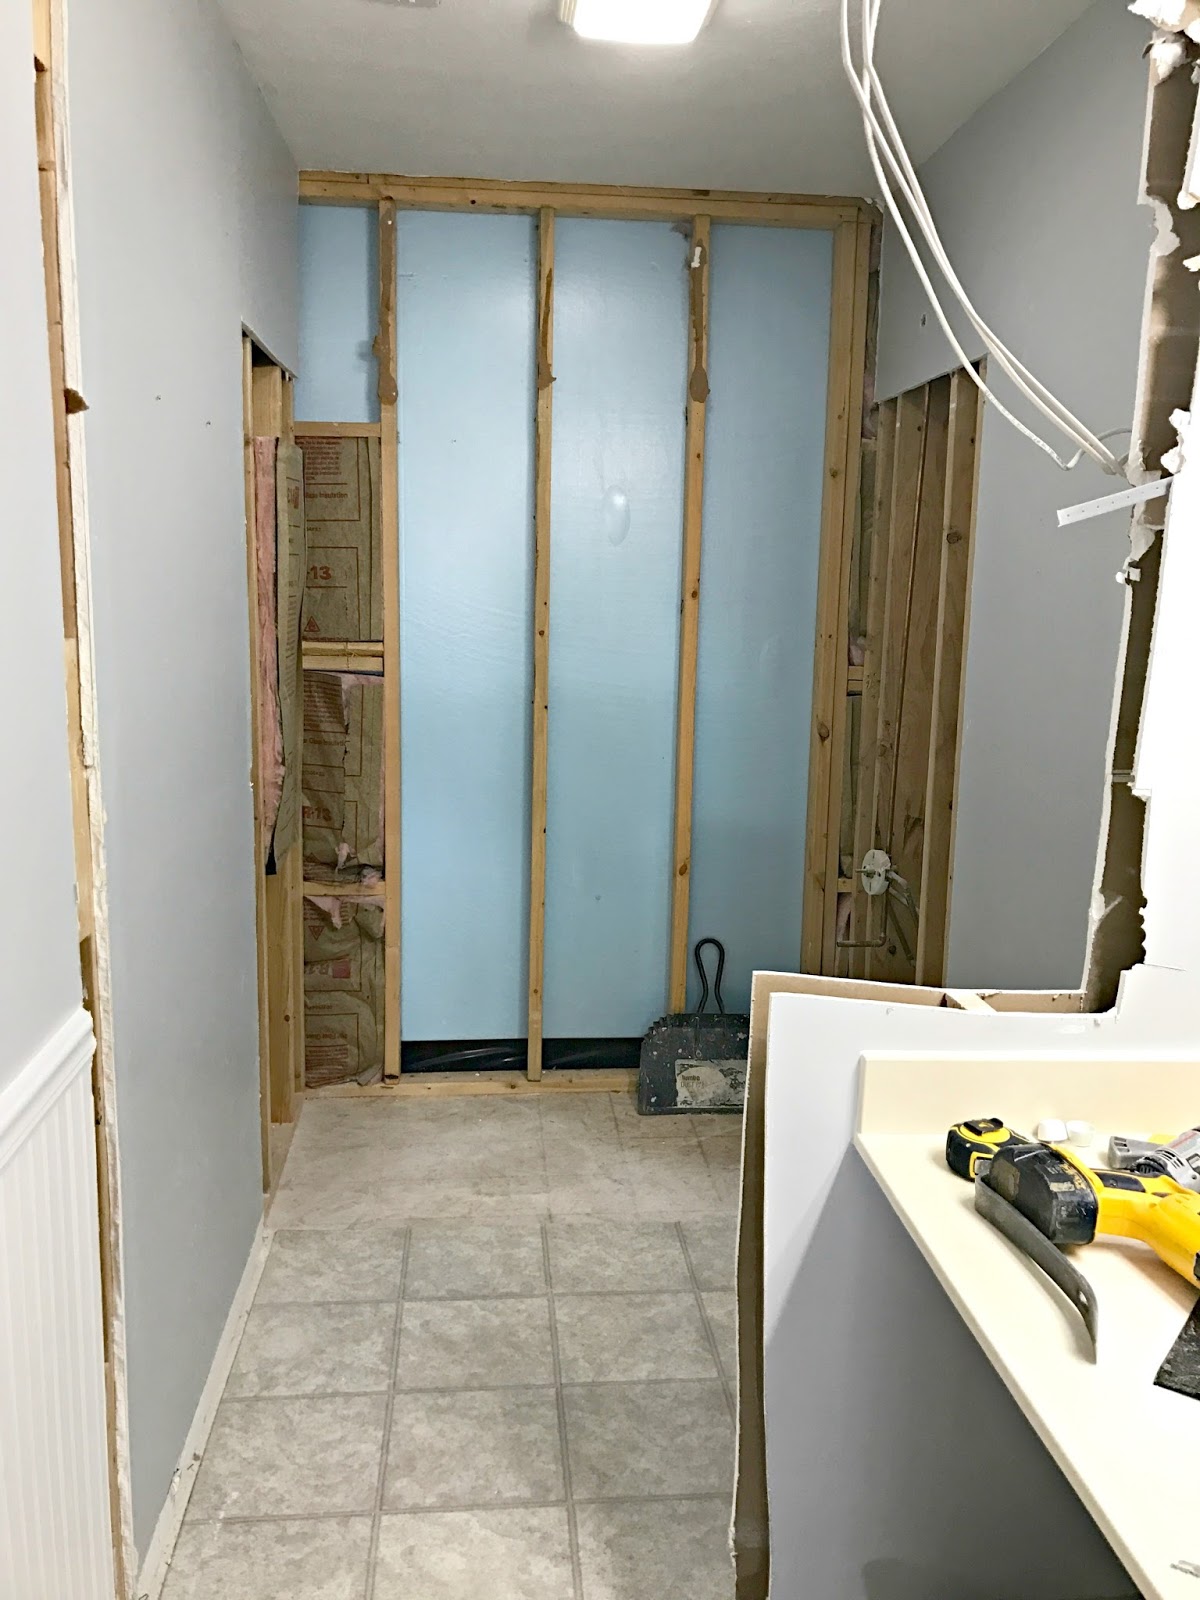
When I last shared it, I was at this point:
How to knock out a wall

I then finished up taking out the studs on the left and at the ceiling and cut back the pony wall a bit. 

I went back and forth on taking out the tub and surround and finally decided we needed to do it. I don't want to spend a ton on a new tub but I do want this room to fit in with the other updates we've made to the house. So the guys remove the tub and surround and I knew immediately it was the right choice: 
Removing tub surround and replacing tub

They put the insulation back in before covering the wall. :) 

We went with a slightly bigger tub -- 32 inches instead of 30 wide. I didn't realize we had such a tiny one in there! The new tub was $200, which is even cheaper than what I had budgeted:
Removing builder tub surround

They had to move some plumbing around to make the new tub work, but I love it so far!

I know there's no curtain and that's why it looks so much bigger...but man, does it feel bigger! I'm most excited about the little things -- I love that we added a niche for shampoo/soap:
Niche in shower

And I had them add a light over the shower -- best thing ever. We have the light on the fan but it still felt dark. 

The BEST part is that they framed the new window out. And we realized to do that correctly (to code with a header and the proper framing), we would have had to take the surround out anyway. We couldn't have done the window properly if we had tried to do it with that. 

So...it ended up being good thing. The window is just framed out for now (I need to order it this weekend), but man, I cannot WAIT to have more natural light in this room. Every time I walk by this dark hole I imagine how bright and airy it's going to be. 

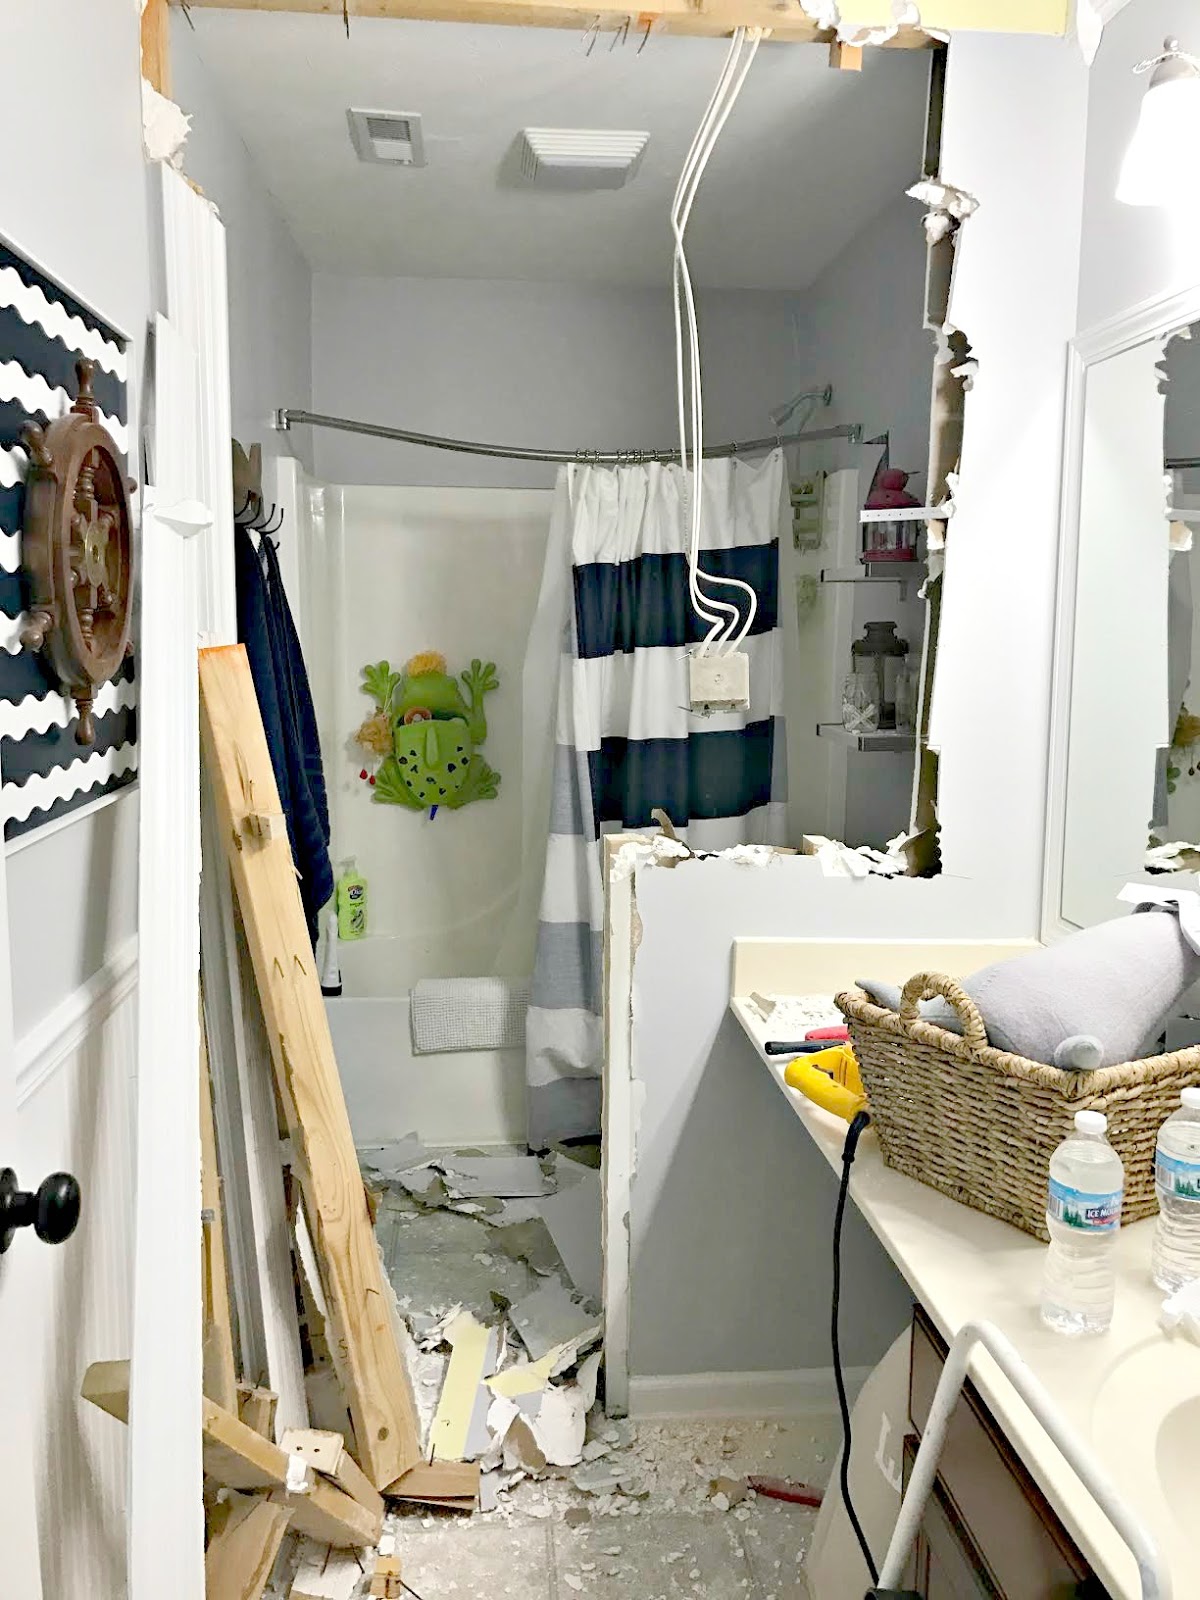
Here's a reminder of what this room looked like a couple weeks ago: 
Wall separating rooms in bathroom

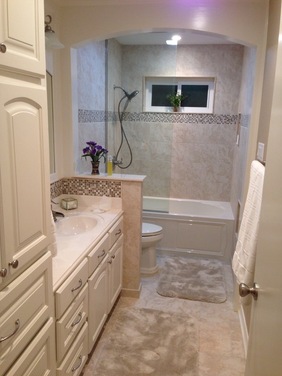
And this is it today: 
Taking down a wall in a bathroom

I'll be making shower curtain that will hang from the ceiling -- I think that helps to make it feel even more open. 

Next steps for me are to frame out the pony wall and small wall around the vent and get it ready for drywall. Then I'll take the vanity out, pull up the vinyl (and put down the correct backer board) and tile the floors. I hope to have the tile done two weeks from now. 

I've only looked one place so far (The Tile Shop when I was picking up the niche for the shower), but I fell in love with these for the floor:
Tile that looks like linen

I'm going to keep looking but aren't those awesome? Love the linen look.  

After I finish the floor tile we can add the plumbing for the additional sink and I plan to build the vanity. Have you seen how expensive vanities are? It's crazy town. My goal is to have at least some of the bathroom functioning most of the time. Right now the sink and toilet are fine. While I work on tile none of it will be usable for at least a week. 

I think we can have this bathroom nearly done in three weeks, but I'll be doing most of it, so it depends on how quickly I can get this stuff done. I'll take you along for the ride as always! 

I'm taking a few days away to spend with family next week but I'll be back at the end of the week! Have a wonderful weekend! 


Wednesday, March 22, 2017

The bathroom renovation has started!

It's been awhile since I've gotten down and dirty with a DIY project and I jumped back in big time with this one! It was SO fun! :) 

My whole family thinks I'm nuts by the way. Husband came home from a business trip and son came home from school to this happening...they know by now to expect this. 

I've talked about the changes I've wanted to make in our son's bathroom for years now. I mentioned in January that THIS was the year we were going to make it happen. My plan was to add a window in the back room first, and then determine if I wanted to take the wall down:
Two room bathroom makeover

But I knew all along I wanted to take it down...I hate it. Loathe. So yesterday I got a wild hair and did just that. Sometimes I'll sit on a project forever until I just bite the bullet and just jump in. I knew I could make some progress on this room and still have it function, so I went for it. 

And man, was it fun! And messy! I loved it. :) 

I knew there was some electrical in the wall, but didn't think there would be any plumbing. I was right...kind of. I started on the toilet/tub side of the wall (in case there was no way to take it down and I would have to patch it up) and made a hole...and immediately saw it. DRATS!:
How to check inside a wall before removing

It's a vent to the roof. I'm not sure if it can be pushed back into the wall, but even if so I don't think the expense is worth it. So I immediately figured out a solution, which I'll show you in a bit. 

I used a flashlight to look both up and down in the wall to make sure there was nothing else to worry about and kept going. 

A professional would be a little more deliberate (clean?) with the way they did this, but I went the easy/messy route. Using a hammer, I pounded through the drywall: 
How to remove drywall

And then I used a saw to cut through it. I did it in sections so it's not the cleanest of jobs, but it will all be fixed later: 
Saw for cutting drywall

There are so many drywall fixes that will have to happen in here, I wasn't worried about perfection. I knew how to take down a wall from when we did this in our family room years back. 

Once I saw that light coming into the dark cave in the back I was SO excited: 
How to remove a wall

The more I removed the happier I was. Whoot!:
Removing wall in bathroom

It was about here where I realized something -- I wasn't sure I wanted to take the WHOLE wall out. I was planning on it all this time but I really liked the idea of a small pony wall there. So I used (affiliate link) this reciprocating saw to start cutting through the studs, and I liked the idea more and more:
Removing wall down middle of bathroom

How to take down drywall and studs

Ignore the sad droopy shower rod. That's on the list. And yes, I left all of the stuff in the room and it was fine. I wiped off the dust onto the floor and then swept it all up. It was actually a quicker clean up than I thought it would be. The mess was welcomed though -- I was so thrilled!

Here's a closer look at the vent...
How to deal with vent in bathroom wall

My plan is to add a stud in front of it and then drywall around it. I may wrap it with stained wood to make it look like a beam -- I'll see when it's drywalled if I want to do that or not. I'm actually not so sad about the vent, because it gives me a good stopping point for the tile behind the mirrors that I plan to add. 

The pony wall will be shorter than this (guessing around three inches shorter) and I'm going to pull the studs out at the end and take it back about five inches:
Pony wall in bathroom by toilet

I didn't want any wall there initially but now I don't mind the idea of a short one. It will still offer a bit of privacy, but again, I'm not sure if that's really needed? I mean, you'll just shut the door. 
How to remove a wall in a bathroom

BUT I think because we have to keep that little bit on the right, it makes more sense to have the half wall there. It would look odd to just have that small wall going down the middle of the room by itself. 

And I've seen all kinds of great ideas for adding storage in bathroom pony walls too -- I may consider something like that!

It only took me a couple hours to get it to this point! Today I plan to take down the door trim and stud on the left side of the room and I'm excited about that too -- I think that will really complete the open feel. I'll take down the wood on the ceiling too, and I may go ahead and cut down the width of the pony wall so I can be done with this step. Here's a look after I finished cleaning:
Removing a wall to open up bathroom

GIDDY!! 

The opening will be much larger by the time I finish up today. Can't wait!! My arms and wrists are already killing me so I just want to get this part done. The next step will be getting quotes for some electrical and plumbing work. I'll be sure to share the process with you every step of the way! 

I had to laugh as I looked back at my inspiration photos I shared years back -- this room is set up nearly the exact same way as how ours will be!:
Bathroom renovation with pony wall

So weird that this is one I shared! Ours won't have the header at the top, but the bump out on the left and the pony wall are exactly how our room will look. And we're adding a window (longer and thinner than this one) to the top of the shower wall. 

I'm so excited to get this moving -- I have NO idea how long it's going to take me but like always I'll be doing it in smaller increments for budget reasons and so we can still use this room along the way. (Although I've told our boy he can't use the back part until we get that electrical back in the wall -- hopefully soon!)


Monday, March 6, 2017

Beautiful before and after projects! (And link up yours!)

Hello my friends! Welcome to a new week! I'm back with the before and after link up for this month. If you're new to this shindig and are a blogger, be sure to check below to see how to link up your favorite before and after after projects! And if you're just a reader, you'll find plenty of inspiration below as people link up their projects. 

I like to share a few of the projects from last month that caught my eye first! Carrie's bathroom makeover was a BIG transformation!: 
Beachy bathroom makeover

You really have to check out the before to see how much it changed!

Carli hit it out of the park again with this SMART and pretty coat closet makeover. It's a total command stations now and I love how she used the back of the door:
Command station coat closet

You have to see how the inside looks too -- love it!

This is brilliant and so easy -- Jenn shares how she hides the electrical box in her pretty laundry closet:
How to hide electrical panel

I love all the navy blue touches in here too! 💙

Angela shared how they created some great storage in an awkward spot by their stairs
DIY toy cubby storage under stairs

I loved that it's tiered to fit in with the stairs but offers as much storage as possible for that spot. 

I LOVE Jennifer's use of color and the pink (that door!) looks SO good with the black and white touches in her new bathroom
Pink, white and black bathroom makeover

I don't care what color you paint your doors -- but do it. ;) It adds so much character to a home! See how I've done it here.

Continuing with our color trend, I loved the awesome storage and pop of blue in Cynthia's light and bright bathroom:
Painted wood cabinet for bathroom storage

She repurposed and old cabinet and this looks amazing! And the storage is great if you don't have a bathroom closet.

Haeley shared her fabulously organized craft closet:
Ultimate craft closet storage

Organized bins and labels make me happy. And I love that you can still see all the color and what's inside each one!

And finally, I was swooning over Melanie's classically beautiful dining room:
dark neutral walls white trim dining room

I LOVE that color -- it's so soothing but looks fantastic against the white trim. I just love this space!

There you go! Some of my favorites from last month -- if you'd like to be considered for next month's share, please add a link to this post or to TDC at the bottom of your blog post. Or you can just copy and paste the code here into your post:

<div align="center"><a href="http://www.thriftydecorchick.blogspot.com/" title="TDC Before and After" target="_blank"><img src="http://www.homestoriesatoz.com/wp-content/uploads/2012/03/beforeAndAfterButton_thumb1.gif" alt="TDC Before and After" style="border:none;" /></a></div>

Now let's see what you've been up to lately! Please link up only you're own projects and/or makeovers!


Tuesday, February 21, 2017

How to not kill your fiddle leaf plant

Hey there! Hope you had a lovely weekend, and perhaps a long one for some of you! 

I get asked about two things more than anything on the blog and social media -- the first is what's that paint color? (You can find all of our paint colors here.) The second is one I would never expect -- how do you keep your fiddle leaf plants alive? 

It seems many have struggled keeping these beauties from dying. The fiddle leaf fig has become incredibly popular over the past few years because of their big green leaves and pretty shape. I think they are the easiest plant to grow but I know many have had problems with them. If you have or are considering one of these, read on! 

I'll share some of our fiddles first, and then some tips. We have nine fiddles in our home and I've kept them all alive over the years. Most are thriving so I consider myself to be a fiddle leaf fig expert at this point. :) 

Some are doing better than others. My favorite, giant one was a killer find at our local nursery. This is how it looked shortly after we got it: 
healthy fiddle leaf plant

It was a $130 plant that I got for $30 because they said it was in such bad shape. At first I didn't see that at all, but then the leaves really started to fall. This is what it looks like now: 
fiddle leaf losing leaves

It's still doing well because a.) the leaves are now a beautiful, healthy, dark green and b.) it's still growing and sprouting like mad. It's grown nearly a foot (I moved that top line of art up years back so it's not a good indicator) and most of the leaves on it are very healthy. 

There's plenty of new growth on the bottom and at the top, but it's not done so well in the middle. I'll explain why it's especially bare right now at the end of the post. 

When I added the fiddle to our new loft space in the early fall last year it was much fuller: 
loft craft room and office

It's been growing well and the leaves are getting huge, but it lost quite a few leaves at first: 
How to fix brown or yellow leaves on fiddle leaf

I'll go into more detail on that one too. :)

But most, and theses are the ones I ignore the most (remember that!), are doing incredibly well! Our master bedroom fiddle is a slow grower but has healthy leaves that are a lovely green:
how to keep fiddle leaf plant alive

So pretty! This one is in our master as well and has grown at least a foot in just a year!:
fiddle leaf plant tips

I should have turned it (and need to) so you could see the size of the leaves on that one. It leans that way to get to the direct sun coming in through our bathroom window. 

My pride and joy is our master bathroom -- it was just a little guy a little over a year ago:
how to not kill the fiddle leaf plant

Isn't that crazy? It's HUGE. 

Our family room fig started out as a little bitty baby (right side of pic):
dark gray fireplace

Now look at him! 😍
tips on how to grow fiddle leaf

(See the end of the post for why the leaves turn yellow.) 

I found this small leaf fiddle at a big discount at the nursery as well: 
small leaf fiddle fig

They said he was doing bad and again, I didn't see it at first. 

He did struggle a little but now has grown quite a bit and is filling in a ton: 
small leaf fiddle plant

So here is my advice for some common issues with fiddles: 

BROWN LEAVES:  I think this is the most common problem I hear! These are tricky because most people think brown crusty leaves mean the plant needs water. Nine times out of ten it's the opposite -- brown leaves are a sign of too much water: 
brown leaves on fiddle leaf

Most of my plants have leaves like this -- usually from overwatering at the place I purchased them. Sometimes if the overwatering stops they will just stay like that for a very long time so I usually break off the brown parts (just don't tear the green part of the leaf) so the plant looks a little better. If the watering continues the leaves will fall off. I think this is the number one reason why so many die.

WATERING:  I only water our fiddles once every two weeks. You just need to watch the plant -- if it's really droopy you know it needs water, but it's very, very rare that mine ever get to that point. 

Keep in mind, if your pot is smaller you will need to water more often. If you have a lot of brown leaves, consider repotting to a larger pot and watering less. 

BARE BRANCHES:  If leaves fall off the branches they will look dead...they're probably not. Just leave it alone and new growth will appear again: 
empty branches on fiddle leaf

I will say, once mine lose leaves at the bottom and middle, it's very rare that they bloom new leaves again there. 

Our huge plant is getting some new growth at the bottom: 
cats peeing in plants
But again, for my taller plants that's rare. Side note -- Nerf bullets. I told you I find them everywhere. Secondly, if you have cats that occasionally pee in plants, rocks work wonders. They don't like stepping on them. You can find them at the dollar store. (Yes she has clean litter, yes she is healthy, yes sometimes she's just a butt and wants to pee in plants.)

LIGHT IS EVERYTHING:  I hear from so many that growing these plants is hard -- but I've found them to be the easiest plant by far. This is because they really need very little -- water every week or two and really great light. That's it! I promise. 

My best plants are in full, direct sunlight from half of the day to all day: 
healthy fiddle leaf care

The ones that struggle more don't get direct light. They will love you forever and be so happy if you put them in full sun. They LOVE it. If you're plant is not growing, it needs more sun. 

Also, if you have yellow leaves (you can see a couple on the plant by our back door), it means that leaf specifically isn't getting enough sun. Often I see this on the lower leaves because the upper ones block them. Sometimes there's not much you can do about that and that can lead to the more sparse branches. 

Now I do my best to turn our fiddles every month so they get full sun throughout. 

REPLANTING OR NOT:  When I bring a fiddle home, most of the time I don't replant it. I keep it in it's original planter and put a plastic water tray at the bottom. If the plant isn't doing well I may put it in a bigger pot, but some of mine that are absolutely thriving have been in the same planter they came in for years. 

You don't have to replant them, but if you are getting brown leaves and want to water less, go ahead and put them in something bigger. Once they get huge, you'll want to replant to something bigger. 

DON'T GIVE UP:  With full sun and little water, these babies thrive. I don't fertilize them, I don't prune them. I don't drag them outside or to the shower to water them (some do and have great success!). I forget about them for the most part and they seem to love that. 

Keep in mind they will go dormant during the winter. So they look their worst right now. Even so, ours are still growing new leaves, just not as fast as usual: 

fiddle leaf new growth

You'll need to be patient with them during these months as they pull back and slow down. :) 

WHERE TO BUY:  I get asked this a lot! Your local nursery will most likely have them. When I say nursery I mean a location with just plants -- if they carry indoor plants. I find they are the most expensive there though. If you find them, keep an eye out for one with damaged leaves and offer to take it off their hands for a discount. 

I used to find them at IKEA but it's been a couple years since I've seen them there. Now the best place I've found is Home Depot -- they usually have them in stock when I stop in. I've also heard Lowe's has started carrying them. I've purchased most of mine at Home Depot for $9 and that's a great deal for their size! 

I've heard some have had luck buying on Amazon, but the one I got there came and was ridiculously small. I mean, barely one tiny leaf so it was just annoying for the price. AND it died within a couple weeks. 

Have you had luck with these beauties? They are by far my favorite house plant, I adore them. They're awesome in decor because of their large leaves and fuller shape. 

If you have any additional questions I'll do my best to answer them!   

Here's an image to pin for later: 
Easy tips for growing fiddle leaf plants


Monday, February 20, 2017

Our new sofa in the living room!

Well hello! Hope you had a wonderful weekend! Ours was mostly very low key, other than some basketball. JUST the way I like it. :)

I'm SO excited to share our latest furniture purchase with you! We don't buy many larger pieces anymore -- what we have I love (for the most part) and have right where it works. Our floor plan doesn't allow for moving stuff around much so when I find a good spot for something it stays. Foreverrrrrr.

It was fun to add a little something new again! You may remember the slipcovered sofa we picked up a couple years ago for our living room:
Slipcovered sofa for a great price

I took a chance and moved things around in here back then and LOVED how it came together. It completely transformed the room.

You won't even believe where that sofa is from either. I'll give you a second to go look at the transformation of that room and the resources here. I'll wait. ;) 
Inexpensive slipcovered sofa

OK so we really do like that sofa a lot. It was really inexpensive but plenty comfy. Many ask if it's the Ektorp from IKEA and it does look similar -- but I find it to be way comfier. (I think I'm the only person on Earth who doesn't care for the IKEA sofas.) 😬

But two things happened. I have to say, I'm not a "fancy room" kind of person. I want every room to be used and I don't want to worry about any of our furniture getting use. But I did find myself wanting something just a little bit fancier in here. Just a bit. 

AND our plan for the completed loft called for a sofa. That was the one thing missing when I finished it up last August. Since then we've found we really want to have a spot to sit and relax up there other than on the window seat or at the desk. 

SOOOO. I've been looking for the past few months at various places. Mostly online and HomeGoods. Although we did buy the slipcovered sofa online, I usually shy away from that. I need to sit on it in real life to see how it feels. One evening in December we were running around and I saw a new store called Urban Underpriced. I think they're just local (for you Indy folks, they are in the old Pier 1 store at Castleton). 

Anyway, I saw a sofa I loved and decided when the budget allowed I would go back to see if it was still there. I had to wait a little over a month and it was still there...but I found another one I liked even better. :) The original price was $799 but they were having a sale and I got it for $550! Considering our slipcovered sofa was only $50 cheaper, that's pretty incredible for the quality: 
Fusion sofa

There's a close up of the fabric. I LOVE it. It's very soft and I love the color so so much. As you know, we have many animals in this house and the dog has already found his new perch on the back of this one. They told me I can clean it myself with a mild soap if needed. 

(I will share the brand name of the sofa at the very bottom of the post with some other details, so check that out if you are interested!)

We don't use this sofa EVERY day so it doesn't get nearly as much use as our family room one. But man...it is SO comfy. I love it!! It's way deeper than the other one: 
light sofa with small arms

It actually measures just a couple inches shorter in length...but it looks so much bigger because of the depth. This size works so much better in here with the tall ceilings. 

I swear it's the size of a twin bed: 
deep, modern sofa in traditional room

We like our naps in this family (well, at least the adults) so comfy couches are very important around here. The first day we had it my husband took one and when he woke up he said "I LOVE the new couch." 

Nap approved. :) 

I am in love with the more modern feel -- I've determined over the years that I don't like big arms on sofas or chairs. I'm all about using as much space in a room as possible and they take up too much of it. I regret getting one with such big arms for our family room. But these are perfect: 
DIY farmhouse window trim

And I like the more modern feel mixed with our traditional pieces. I am switching out the coffee table and when I do I'll show you (and explain why). Maybe even this week if all goes well. 

The old sofa is upstairs in the loft now and it's awesome to have one up there! This coffee table will go up too. We've lived in our home for almost 13 years and just in the past year I'm starting to feel like the rooms are filled just right. It takes time my friends! 

Now...the important question. It's all about the pillows -- I actually quite love the ones they sent with the sofa, which is very rare. Usually I don't use whatever comes with the couch. But when I put my old blue ones on there I think they look lovely on it too: 
light sofa with blue pillows

neutral sofa blue pillows

Here's a rare aerial shot for you -- I love this angle! Here are the original pillows: 
furniture layout for two story living room

And the new ones:  
two story living room layout

I like them both for different reasons. As much as I love the new ones I'm leaning towards the original ones. The new pillows look really good up in our loft on the old sofa too! I'll let you know what I decide. Because these are the deep things that matter in life. ;)

I hope to share the coffee table change up soon!

P.S. The brand name of this sofa is Fusion and again, our store is called Urban Underpriced. (VERY cool store with great accessories, but they are expensive in relation to the furniture.) I found Fusion online and it looks like they have reps you can contact to find out a local store. Our sofa color is called Grassroots if that is what you are interested in and they had a loveseat that matched. It is 83 inches long by 41 deep. :)

OH and we've had the new rug since last year and I got it at HomeGoods. Our dog ruined the old one. :(