Sunday, April 9, 2017

Finished shiplap walls and farmhouse door trim in the loft!

Oh MY. I've been nailing, filling, caulking and painting for what feels like weeks. It's only been three days but I am worn OUT. :) 

I've been focused on the "hallway" part of our loft for the past week or so. This is the open space at the top of the stairs and I want to make the most of it. Here's how it looked back in June before I started replacing the door trim: 
open hallway with doors

This space isn't big but took a lot of work! Gah. I'm SO HAPPY this part is done. 

Here is the pretty DIY farmhouse door trim installed (just not looking so pretty yet): 
DIY farmhouse door trim

I've added this trim to almost all of the doors in the house and it makes a BIG difference. They look so much more custom! 

I showed you how I add the look of shiplap for less on this wall: 
how to add shiplap walls for less

But I still had a lot to finish up. Most were smaller walls but it just takes a ton of time. As I've mentioned, this is not a hard project, it's just very time consuming. Painting three coats on everything takes eons, for real. 

I had to finish up the planked walls along the rest of the hall and then add trim and baseboards everywhere. I also finished up the baseboards around the stairs and over on the other side of the room (that I still haven't shown you because it's kind of boring right now). 

This is how the luan looks before painting: 
adding planked wood walls

As you can see all of our security system stuff is on this wall. Not pretty but not much I can do about it. I do need to patch a small hole up there but that will have to wait. 

The first day I finished up the wood walls, the second day I filled and sanded all the holes, the third day I painted (forevvvvver) and caulked, and this morning I finished up with one more coat on everything and a little more caulk. 

Thankfully I'm THRILLED with it!: 
tall white shiplap walls

I can't even tell you how much it brightens up this space. I told you before that these white walls have me considering doing it everywhere but I'm not sure I could take that leap. I do love contrast -- though the dark floors against the white walls sure is yummy. 

By the way, speaking of white walls, those stairway walls will go light sometime next year. I have a big project in mind for the entire staircase but it will be some time before I start it. I think it will pull everything together beautifully. 

I am looking forward to adding art up here and can't wait to see how it will add some pops of color and fun to the space. I think the white walls will make the art stand out even more. And now I cannot WAIT to paint those doors black. I've done the rest of the house but still have the upstairs to do. They are going to look so amazing!: 
white shiplap walls around doors

I'm not sure I'll get that part done for the reveal but I'm going to try! I still love it just as is so I'm not going to be in a huge rush. 

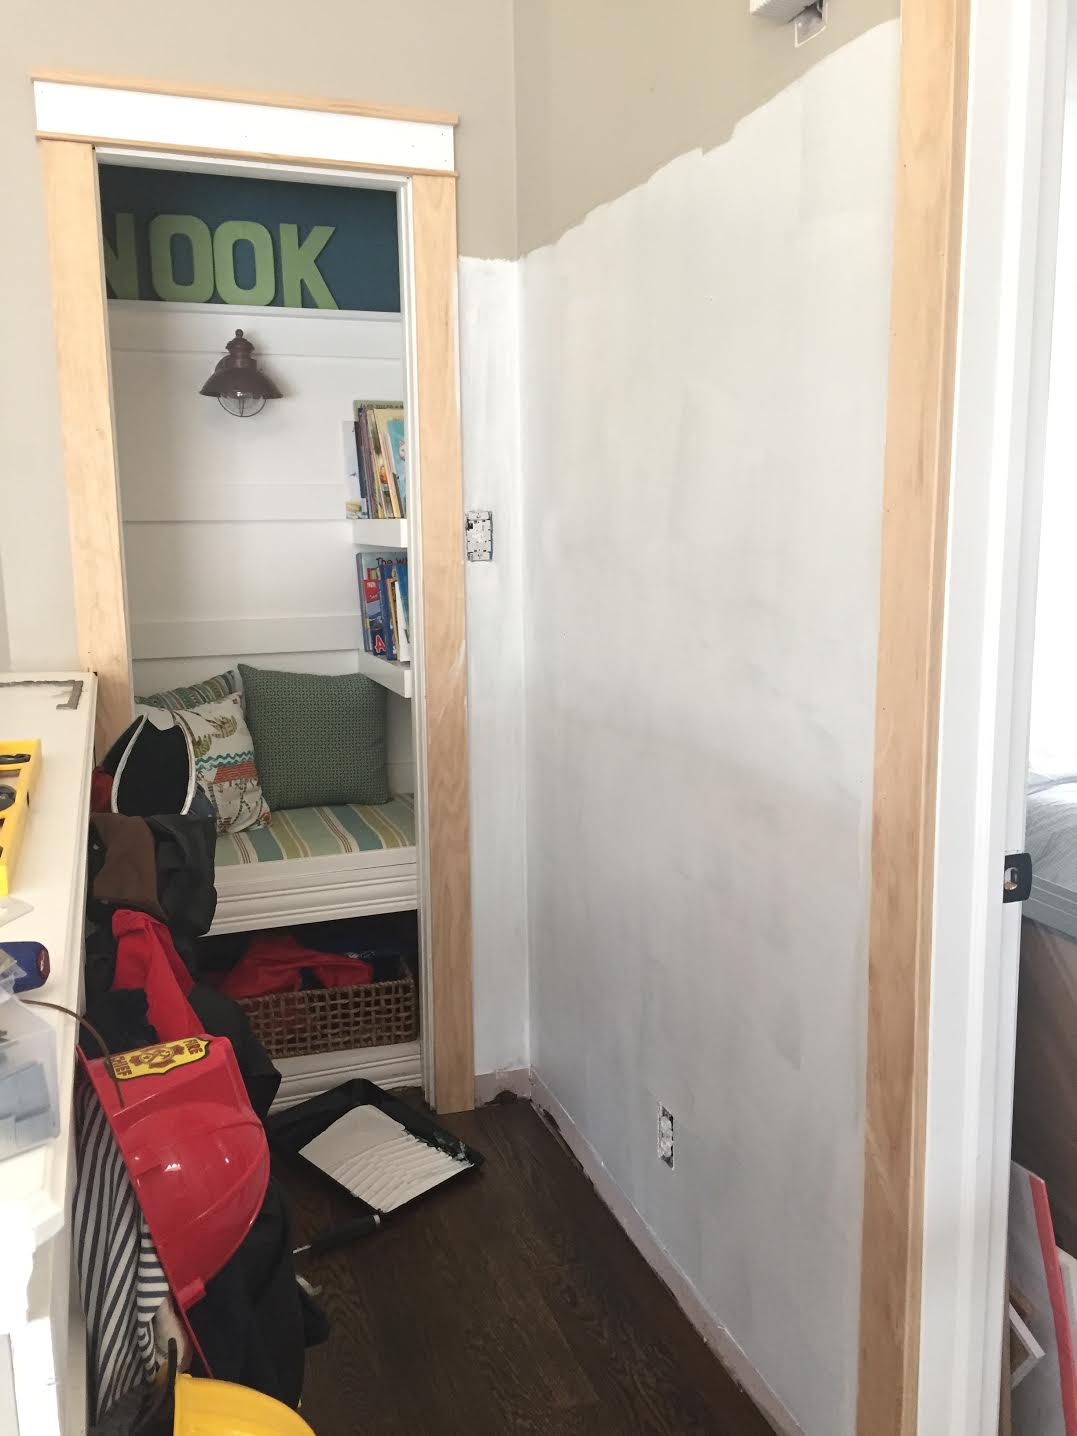
I took the trim down around the "hall" to the book nook -- this is the closest we come to a hallway in our open concept house: 
DIY book nook closet
I think the new door trim and wall treatment make that little closet shine even more. :) 

I'm just so happy with how this has all come together -- these walls have completely transformed this room. All for just a couple hundred bucks and a lot of sweat equity. Now I am getting really excited to get the room done and start decorating: 
Today I'm finishing up the caulk and paint on the baseboards in the rest of the room -- this is the tedious stuff that is not much fun. Although sometimes if I have the time and a good show on TV it is kind of relaxing. 

I've made a deal with myself that I MUST finish up this small stuff before I can move on to the last few bigger projects in here. I'm so excited to start the one that will go above the cabinets: 
large shiplap walls

I also plan to at least prime those cabinets and doors this week. The final painting may need to hold off till the weekend. 

After the cabinets are done I can move on to the desk and one more small storage spot I'm incorporating into that. I had a goal to finish this before school started but that didn't happen. I do think I can get it all done by the end of the month though. Then I can focus on other smaller projects and FALL! Heart eyes. :) 

For now I keep standing back and enjoying the pretty white walls I've finished up. Here's a reminder of how this spot looked with just the new door trim: 
farmhouse door trim

And here's how it looks today: 
shiplap walls and farmhouse door trim

Love it! Hopefully I'll have another loft update for you next week! 

I'm off to wrap my right arm with a heating pad and then get back at it. I think a massage may be needed as my reward. :)

SaveSave

Saturday, April 8, 2017

Adding some rustic charm to the kitchen

Hey all! I got a late start writing this morning because we started some more demo on the bathroom! I'm so stoked. I finished up taking down the wall last week but today they are taking out the tub insert and replacing it. We went back and forth about taking out the "builder" tub with the surround and went ahead with it. 

They'll also be making some small lighting changes and then when the budget allows I'll move on to the new window, flooring and then a new vanity. 

I work with Minwax a few times a year because I LOVE their products and love sharing how you can use them in your home. I think adding stained wood touches around the house adds a slight rustic charm and some warmth that's always welcomed. 

This weekend I completed a quick project that I think makes a big impact in our kitchen. LOVE it. We've had a chalkboard on one of the walls for years: 
Chalkboard wall in kitchen

It actually started as a much smaller chalkboard that I framed out years and years ago. I used magnetic paint on it too -- but I tell you what, that stuff is a pain in the butt. You have to mix it like crazy and it still takes a bunch of coats. 

Because of that I didn't go magnetic with the rest of the wall. But you can still see where that smaller part of the wall used to be framed out because it is thicker there from all of the coats. I wanted to try to cover that up just a bit and I've just felt like that spot needed some warmth. 

Wood and stain to the rescue! I took a trim to Menards because I wanted very thin but wide wood, and they have the best trim selection I've found. I ended up using this wide lattice: 
wide lattice wood

I only needed three pieces so this project only cost me $20! 

It was just a little bit rough so I did a very light sanding -- nothing crazy:
prepping for stain

Make sure to wipe the dust before you start the staining process!

As always, I started with the Minwax pre-stain conditioner. I don't stain without it anymore -- it gives the wood a nice even surface before staining: 
preconditioning wood for stain

It's nice because you can stain pretty much immediately -- no waiting! 

I have fallen in love with the Provincial stain (and every time I see or write it I think of Beauty and the Beast -- it is such a beautiful movie!!). This color is just a lovely in between -- not too dark or light and it really shows off the beauty of the wood. 

As you can see, I use foam brushes most of the time when prepping, staining and protecting the wood: 
how to stain wood planks

I don't recommend using foam rollers for any of these because it will leave you with some bubbles -- you'll have to go over it a few times in ensure they're gone. 

It is important when staining that you make sure you can complete your stain -- you can't start and stop in the middle. Also, as you're going, be sure to brush back over the wood. Lines or bubbles like this are what you want to avoid:
Mistakes to avoid when staining

The longer you let the stain sit, the deeper the color. I don't ever find it necessary to leave it for more than a few minutes though. You can always do another coat if you want. I err on going lighter because it's difficult to go lighter when you've stained it too dark.

Here's how it looks after wiping the stain (bottom ones have been wiped, top is still wet):
Step by step how to stain

Don't worry though! You'll get that richer look back when you protect it at the end!

Once the stain dried I hung my boards: 
Framing out a chalkboard

We have nine foot ceilings so the vertical pieces had to be added on to -- I cut them at an angle (I just find it's easier to make it seamless when you do an angle) and then finished it up at the bottom. I didn't miter (or angle) the rest of the pieces -- they are all straight edges. 

When it was all up and I was sure it was dry, I added a coat of the Minwax one coat polyurethane
One coat polyurethane by Minwax

Again, the foam brush gives you good control and allows you to knock down any bubbles. Bubbles are bad when staining or protecting your wood! :) You want a nice, smooth surface when you're done. 

I hadn't tried this poly before and quite liked it. It dried quickly and left the wood smooth to the touch: 
One coat polyurethane

Poly always brings that deeper look back to the stain/wood. With the chalk dust here I wanted to make sure I could easily wipe these down if needed.

I liked the end result even better than I thought I would. I knew it would bring more warmth to the room and I'd love the stained wood with the black, but it's just even prettier than I imagined:
Stained frame around chalkboard wall

I had the EAT sign and ended up doing a quick coat of the stain on the top of that as well! I wanted it to match up with the frame just a bit more. 

The wood ties in so beautifully with the other wood accents in here -- the kitchen chairs, shelves and even the island top (which is lighter): 
Large chalkboard wall in kitchen

I use upside down cup pulls to hold our chalk. I did the same upstairs: 
DIY chalk holder

I just add a tiny drop of hot glue on both ends and they hold up great. 

I love how it looks like a little smiley face. ;) So often it's the simplest projects that make the biggest difference! I just LOVE this. I have wanted to add this little detail for at least a year now and don't know why I waited so long. It only took me a few hours, start to finish: 

You can see more about that big chalkboard wall here. If you have any questions at all about this process or how I made the chalkboard wall, feel free to ask! 

You know how much I love a pop of black in a room and a chalkboard wall is the perfect way to add that -- it's just a fun addition too. Kids in the house or not. :) 

Here are a couple more chalkboard projects if you're interested! OH, and my pin it button is working again (it was gone for months, I'm incredibly on top of things) so you can just hover over the photos and click that on the top right to pin anything. 

Basement kitchenette chalkboard wall and shelves:
Basement kitchenette with chalkboard wall and shelves

Giant DIY board made from scratch for our office/craft room: 


I was compensated by Minwax for this post and I only share products with you that I use, love and trust. 

Wednesday, August 3, 2016

How to add the shiplap look to your home (for a lot less!)

Hello all! I've gotten so many questions about the planked walls in our loft lately, I decided to give you a step-by-step process on how to do it. If you love the shiplap look on Fixer Upper than this is the tutorial for you! This is the same look but waaaaay less. 

It cracks me up that this look is called shiplap now -- yes, I know, that has been around forever but many of us called it planked walls for years. I've done it numerous places around our home and I'll link to those at the end of the post.  I've done it a few different ways and this one by far the cheapest and most customizable. 

Here's our large planked wall in the loft before I started the other walls: 
craft room with planked walls
I love it! 

Now REAL shiplap is not cheap: 
real shiplap prices

This is 12 feet so in terms of trim or wood, that price isn't too bad. But that wall above would have at least $150 (it's wider than what I used so not sure exactly how many I'd need) and it only cost me about $65 to do that huge wall. 

Real ship lap is thick and has tongue and groove that you use to "lock" them together: 
real shiplap

Instead I use underpayment, or luan. It comes in four by eight foot sheets and you can have it cut down to whatever width you want. I find if I do 5 3/4 widths than I get get a full eight strips out of each board: 
underlayment for planked walls

I love that it is very thin and lightweight -- really easy to work with. I also love the look of it. When painted if you look close it has a slight wood grain. 

Here's a before shot of a wall that I finished up the other day. This is going to be fun spot in this room (I'll tell you more about that later): 
book nook out of closet

That's our book nook, one of my favorite spots in our house! As you can see we also keep the dress up clothes here. My son has mostly grown out of that but other kids love to use them so they will stay. :)

The first thing you'll want to do is paint the wall behind the wood the color you'll paint the planks. I am not picky about this -- it's one coat and done for me:
prepping for shiplap walls

Then you can use your pieces and start hanging them. Something to consider now -- it used to be free to have these cut down at Lowe's. Then they added a small .25 cent fee to anything over a few cuts. Now…$1 a cut?:
Where to get wood cut

I understand that this probably takes up a ton of their time so I'm totally on board for charging, but the increase surprised me. And the scheduling part too. I had just seen this sign so was nervous they wouldn't help me but they did and didn't charge. I find if you go during the day at a slow time (late morning or mid-afternoon during the week) then they are happy to help. I'm not sure if Home Depot is charging as well? 

Anyway, keep that in mind if you don't have a saw or someone who can help you!

When I install my boards I use a level to make sure each one is straight but the most important one is the first! Make sure that one is perfectly level. Then after that I keep using the level and adjust certain areas as needed. For spacing I use a penny: 
tip for installing planked wood walls

You can use anything, this helps to keep it consistent. 

Here's another tip -- if you have a long expanse to cover I suggest you cut some pieces at the length of the studs. I marked on the wall where they were (for nailing them in anyway), but this also gave me measurements for some of my boards. 

I did a very simple pattern based on the studs and kept it consistent -- one long piece, one cut about in half (at the stud) and then would rotate from left to right with a long piece/short one on the next row. I repeated that pattern all the way down:  
how to install a planked wall

Cutting your wood will make it go further. If you cut each piece the length of the wall that is great, but you will have a TON of scrap that will go unused. I find cutting them makes it so I can use almost every bit of the luan. 

And you cut at the studs so that the end of each piece is secure when you nail it in. If the end of your cut is not at a stud then the wood may not always hold flat against the wall. Again, this stuff is pretty thin so that's not a huge problem. 

Some putty to fill holes (sometimes I just leave them because I like the look) and few coats of white with a roller is all you need to finish it off: 
getting the shiplap look for less

This actually needs one more coat, and the door trim needs to be painted, and that small wall needs to be done…but you get the idea. ;) 

I will add a couple of smaller trim pieces up on top to finish off the wall as well. 

I love this look (as you know if you've seen the rest of my house) and it's becoming extremely popular because of Fixer Upper. Here's a look at that wall (mostly) finished up:
shiplap for less tutorial

Do you see my little addition down at the bottom? This is going to be our Disney wall with photos and mementos from our trips and I wanted it to be FUN. I found a fairy door online months and months ago and had to get it: 
fairy door

I think it's adorable and I have a couple more additions to that to finish it up too. :) 

Here's a look at the other side of the room with the finished "shiplap" walls:
how to add shiplap to walls

If there is anything I didn't cover that you have questions about please let me know! Overall this is a simple DIY project, it just takes time. You will need at least a handsaw to cut the boards as you install and I use a nail gun to put them up. As I've said before, I would not use glue unless you are positive you will never take them down. You'll be left with a mess if you do!

Here are some other shiplap/planked wall projects I've completed over the years!

Our family room fireplace:
gray and marble fireplace

A stained accent wall over the basement kitchenette: 
stained shiplap wall

(That's one of my favorites!)

On our basement stairs I used simple wood planks that come in packages (these are thinner widths): 
wood stained planked wall

I also used these in our powder room renovation
white planked wall bathroom

Those are easy to use as well but often many of the pieces have huge knots in them and I end up taking a bunch back. The luan is much cleaner and easier to work with. :) 

Have you added this look to your home? Feel free to add links in the comments if you have. I will be back next week, as I'm heading off to the Haven Conference for our fifth year! Can't believe it! 

See you next week! :)

Monday, July 25, 2016

Finished window seat, ship lap walls and craftsman trim in the loft!

OK, well I lied. ;) I said I wasn't going to share more of the loft redo for a week or so but I was a beast this weekend. I mean, BEAST. We didn't have much planned so it was great to have tons of time to dedicate to this space. I made some major progress that I'll share with you this week. 

My goal was to have this space done by the time school starts and my time is quickly dwindling. I'm going to try really hard to get it done but I doubt it will happen -- I lose four days out of town for a conference. Who knows? Maybe I'll pull it off. None of the remaining projects are hard, they're just busy work. 

SO. Last I left you, I had installed the baseboards throughout most of the room, including the window seat: 
Craft room makeover progress

Here's a view of the other side: 
Craft room makeover

My first project was to trim that seat out with the same trim I use all over our house. I seriously use this stuff everywhere. It's called sometimes called lattice and it's very thin. I always get pine: 
Lattice trim

Menard's has wider sizes than anywhere else I've found -- this one is 1 3/4 inches wide. The other hardware stores carry thinner sizes. You can see all the ways I've used this stuff around the house here and I also used it on our extended kitchen island. It's the perfect detail to finish off projects (and it's cheap!).

I did a simple look on the window seat -- I framed out the front and then just put three smaller vertical pieces down the front to create panels. Then I painted the whole thing in out in semi gloss paint. I use semi gloss for all trim and built ins:
Trimming out window seat

I was SO happy with it when I was finished and couldn't wait to get to the next part: 
Craft room makeover progress

I pulled out the old window sill and then trimmed out the window with my DIY craftsman trim like I showed you how to do a couple years ago. I lowered the bamboo blinds back down inside the window frame (they were hanging above the window before) and it helped tremendously. It looks so much cleaner now! 

For years I had plug in sconces flanking the windows and when I took them down the old pink paint color was still there. Plus, I used my cord covers on the wall and they had been up so long they ripped the drywall off. I knew eventually I would address it so I've left the walls like this for years. Good times. 

I'm SO happy those spots are covered up!! I used the same planked wood as for the the large wall for these smaller areas: 
DIY shiplap walls

This look will continue around the room as well. Here's a look at both sides with the new window trim:
Simple planked walls

I added some trim to the tops and each got a few coats of paint and caulk to hide any imperfections. Told you I was in beast mode. ;) I didn't work out for three days because stepping up and down off of that window seat was plenty. 

It looks SO LOVELY. I'm thrilled with the progress in this space. Here's a closer look at the simple trim on the window seat: 
Simple way to trim out built ins

And the new trim on the window: 
DIY craftsman window trim

I don't have a table saw so I had that bottom wall piece cut down and will install it today. 

I also finished up a little DIY project for that wall to the right last night, but I'll show you that later this week: 
Window seat with tons of storage

I still need to do some minor things like touch up the wall paint around the window (I had so many holes in the wall from moving drapes and art around over the years) and make or find some more pillows, but other than that this wall is done and I LOVE it. OH and cushions…not sure when those will happen though. 

Many of you asked about those pillows and I found them all at HomeGoods. I'm going for fun and a bit girly in here and the colors look beautiful against the white: 
Bright colored pillows

White shiplap walls

I worked hard on this room over the weekend…I continue to see my vision coming through and it's so fun. I've really enjoyed working on this space!

Here's a before of this corner of the room:
Cabinet storage in craft room

And here's how it looks now:
Wide planked walls

That open cabinet will get a door once I cut it down and rework it. 

Here's how this corner looked last week:
Building a long window seat
And how it looks now: 
Window seat with storage

And the wide shot, before we had the floors put down: 
Craft room redo

And the progress so far!: 
Craft room redo progress

OH my goodness, I love it! I'll share my little project on the wall to the right later this week -- any guesses what it is? :)

If you have any questions about the items or projects in this room please let me know! Here's the posts on this space so far.

  1. Removing baseboards the easy way
  2. New floors and craftsman door trim
  3. Window seat and a planked wall
  4. Scones and tons of storage

SaveSave