Wednesday, April 12, 2017

How to make a DIY wrapping paper station (for cheap!)

Hey there! We've had a busy week soaking up some summer activities…our time off is coming to a close soon. This week alone we visited the Indy Children's Museum, explored downtown, saw a movie and took a trip to Kings Island. Such a blast but I'm ready to relax a bit today! (If you are interested in visiting our fun city, check out this post and this one for my tips and our favorite places.) 

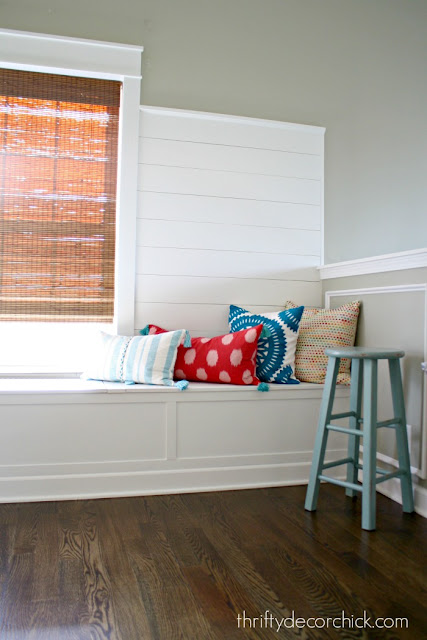
I'm back today with a quick and easy project that I finished up in the loft last week. I'm pretty excited about it! Last time I shared this space I had this empty space above the window seat
window seat with pillows

I've known all along exactly what I wanted to put there -- a gift wrap station. :) I'm all about form and function and I knew this would be cute and serve a purpose in this space. 

I hardly spent anything on this because I used old trim from this room for the frame. You can definitely put this directly on the wall but I wanted to make a little bit more of a statement and I had the trim anyway. 

I had plenty of wall space but didn't want it to go too low -- that corner is already my favorite spot on the window seat and I didn't want to worry about hitting my head. :) Turns out you can fit quite a few rolls in a small space. I ended up with 24 inches tall by about 34 wide: 
how to make a wrapping paper holder

Most gift wrap is 30 inches wide but Christmas wrapping is sometimes wider so that will just depend on your needs. 

I nailed the trim directly on the planks and then cleaned it up -- putty for the corners and holes and a couple coats of semi gloss paint: 
wrapping paper station on wall

The next part was super easy. I picked up some dowel rods in the 3/8 size (again, any size will do, just make sure they don't bow with the weight of the paper): 
dowel rods for wrapping paper holder

And a couple packages of gold cup hooks
hooks for wrapping paper

Make sure your rods will fit in the hooks! Mine were 7/8 inches so it worked perfect. 

I did some trial and error to decide on the layout -- I knew I wanted six up there so I measured out every 3.5 inches. I held my measuring tape up and marked those distances down the length of the trim, making sure each one was in the middle: 
how to make your own wrapping paper station

Make sure you do the exact same measurements on the other side. Then you've got yourself a super cute display that functions great as well: 
wrapping paper storage for wall

OH I just love it!! So cute! Of course I got it up and decided I needed a few new rolls of paper to make it even cuter. :) I couldn't resist. 

I love the pops of color against the white wall. I'm starting to love how everything kind of "sings" against white. I don't think all white would ever happen in our house but I can tell I'm going to like it in this space: 
DIY wrapping paper storage

To access the paper I can either pull the wrapping out from the wall and cut it where it is, or it's easy to take them down. I will probably just take them down when I need them. 

All in all this was only a $10 project since I had the trim, and as I mentioned, that's optional anyway. 
DIY wrapping paper holder

Not gonna lie, I'm already thinking about how cute it will look with Christmas paper! :) 

There you go -- a simple, inexpensive project that you can adjust to your needs. I absolutely love mine and am happy I was able to put that space to use. 

Have a great weekend my friends! :) 

Affiliate links included for your convenience!


Sunday, April 9, 2017

Finished shiplap walls and farmhouse door trim in the loft!

Oh MY. I've been nailing, filling, caulking and painting for what feels like weeks. It's only been three days but I am worn OUT. :) 

I've been focused on the "hallway" part of our loft for the past week or so. This is the open space at the top of the stairs and I want to make the most of it. Here's how it looked back in June before I started replacing the door trim: 
open hallway with doors

This space isn't big but took a lot of work! Gah. I'm SO HAPPY this part is done. 

Here is the pretty DIY farmhouse door trim installed (just not looking so pretty yet): 
DIY farmhouse door trim

I've added this trim to almost all of the doors in the house and it makes a BIG difference. They look so much more custom! 

I showed you how I add the look of shiplap for less on this wall: 
how to add shiplap walls for less

But I still had a lot to finish up. Most were smaller walls but it just takes a ton of time. As I've mentioned, this is not a hard project, it's just very time consuming. Painting three coats on everything takes eons, for real. 

I had to finish up the planked walls along the rest of the hall and then add trim and baseboards everywhere. I also finished up the baseboards around the stairs and over on the other side of the room (that I still haven't shown you because it's kind of boring right now). 

This is how the luan looks before painting: 
adding planked wood walls

As you can see all of our security system stuff is on this wall. Not pretty but not much I can do about it. I do need to patch a small hole up there but that will have to wait. 

The first day I finished up the wood walls, the second day I filled and sanded all the holes, the third day I painted (forevvvvver) and caulked, and this morning I finished up with one more coat on everything and a little more caulk. 

Thankfully I'm THRILLED with it!: 
tall white shiplap walls

I can't even tell you how much it brightens up this space. I told you before that these white walls have me considering doing it everywhere but I'm not sure I could take that leap. I do love contrast -- though the dark floors against the white walls sure is yummy. 

By the way, speaking of white walls, those stairway walls will go light sometime next year. I have a big project in mind for the entire staircase but it will be some time before I start it. I think it will pull everything together beautifully. 

I am looking forward to adding art up here and can't wait to see how it will add some pops of color and fun to the space. I think the white walls will make the art stand out even more. And now I cannot WAIT to paint those doors black. I've done the rest of the house but still have the upstairs to do. They are going to look so amazing!: 
white shiplap walls around doors

I'm not sure I'll get that part done for the reveal but I'm going to try! I still love it just as is so I'm not going to be in a huge rush. 

I took the trim down around the "hall" to the book nook -- this is the closest we come to a hallway in our open concept house: 
DIY book nook closet
I think the new door trim and wall treatment make that little closet shine even more. :) 

I'm just so happy with how this has all come together -- these walls have completely transformed this room. All for just a couple hundred bucks and a lot of sweat equity. Now I am getting really excited to get the room done and start decorating: 
Today I'm finishing up the caulk and paint on the baseboards in the rest of the room -- this is the tedious stuff that is not much fun. Although sometimes if I have the time and a good show on TV it is kind of relaxing. 

I've made a deal with myself that I MUST finish up this small stuff before I can move on to the last few bigger projects in here. I'm so excited to start the one that will go above the cabinets: 
large shiplap walls

I also plan to at least prime those cabinets and doors this week. The final painting may need to hold off till the weekend. 

After the cabinets are done I can move on to the desk and one more small storage spot I'm incorporating into that. I had a goal to finish this before school started but that didn't happen. I do think I can get it all done by the end of the month though. Then I can focus on other smaller projects and FALL! Heart eyes. :) 

For now I keep standing back and enjoying the pretty white walls I've finished up. Here's a reminder of how this spot looked with just the new door trim: 
farmhouse door trim

And here's how it looks today: 
shiplap walls and farmhouse door trim

Love it! Hopefully I'll have another loft update for you next week! 

I'm off to wrap my right arm with a heating pad and then get back at it. I think a massage may be needed as my reward. :)

SaveSave

Wednesday, February 8, 2017

How our least used room has become the most used and organized!

It's been about six months since I finished up our loft makeover and I have to say, beyond our kitchen and basement projects over the years, this redo is the smartest and most used in our house. I LOVE that because we barely used this room before. 

I gave up my office when we took down a wall and extended our family room years ago. For a couple years I didn't mind not having a true work space and would just sit on a chair and work from there. But I was starting to crave a dedicated office again, but I wanted it away from our living spaces.

This unused space was a PERFECT fit...we didn't realize how perfect until after it was finished:
Office with huge DIY desk and built ins

My husband has a studio set up in the basement but craves natural light during the day when he works (I don't blame him). So now most days both of sit at the big desk together and work. I love it! The desk has worked SO wonderfully. This morning I took a pic of it covered with stuff to show you -- he had his keyboard and computer there and I had my sewing machine and fabric all over, and we still had plenty of room. (I accidentally detailed the picture, dangit.) 

Anyway, this room works smart for us and I promised months ago that I would share more about the awesome storage and organization in here. First up, that huge window seat that serves double duty:
Desk with window seat in office/craft room

Window seat along wall

It spans the whole wall and when it was built I had them break it up the inside into three sections. 

One I use for wrapping needs like boxes, bows, bags and the like: 
Storage area inside window seat

I found the bins at the dollar store and they hold smaller stuff like bags and boxes. 

The middle section is where I store my sewing machine and extra fabric:
Storage inside window seat

And the last one is for toys, games and gifts that I buy when I find them on clearance or duplicates we get as gifts: 
Window seat storage holds a ton of stuff!

I had gathered so many little gift items over the years -- and didn't realize it because I had everything stuffed in a drawer before. Now I'm trying to get this section emptied out and I'll used it seasonal pillows and inserts.

I have found that window seats are such a lovely combo of form and function -- they look so good, give you another place to sit and offer so much storage inside!

Another area of this room that we are LOVING is the huge DIY chalkboard:
Large DIY chalkboard

We use it for lists a lot -- I'm a visual person and need to see my list in front of me. Back when I finished the room I drew a calendar on the wall with chalk, just to see if I'd really use it. 

Turns out I love having it so visible so I went ahead and used my level and a white Sharpie marker to make it permanent: 
DIY wall calendar on chalkboard wall

Now I can write in the dates and appointments on the calendar and when I erase the calendar stays put. It's such a little thing but it really has helped me stay on top of things. 

By the way, I use a cup pull turned upside down to hold the chalk. :) I just hot glued it on there:
DIY large chalkboard

I had the sticky letters for years in my craft stash and thankfully there were enough to add the days at the top. 

The wall of cabinets (kitchen cabinets are crazy versatile!) gives us a ton of storage for craft and office supplies:
Large DIY desk with cabinet storage

I've had these bins forever -- they are just the canvas square storage bins you can find at most stores. I have craft stuff organized by topic -- glue, Christmas, fall, wood, paint, etc: 
Hidden craft room storage

I had a bunch of wood tags I used years ago (when this was the Bub's playroom) and spray painted them with chalkboard paint: 
Hidden craft room storage

I just glued them on the back of the cabinets and I can erase and change the name if needed. 

I LOVE that I have empty space in the cabinets: 
Canvas bins for craft supplies

As you can see, I configured the cabinets so that the doors under the desk open the opposite way. I put seasonal stuff in these and don't have to access them often -- even though they are still easy to get to. 

We have our extra office supply stuff down in my husband's studio but I'm thinking I'll move it all up here since we have plenty of room. The bookcase at the end of the desk holds more craft storage and office supplies: 
Large desk with bookcase

And for stuff that we need to reach for while working (things like tape, stapler, notepads), I use a tray to corral it all: 
Pretty tray for office supplies

That plant was looking sad when I took this...we hadn't had sun for what felt like weeks. We had three days of sun this week and he's looking so much better. ;) 

I think (other than the kitchen) this room is our hardest working in the house. That kind of blows my mind because we didn't use it much before! I take forever to tackle and finish rooms in our home but I know it works in our favor. Our rooms function so well for us, which is worth the long makeovers! :) 

To see some cute craft storage pretty enough to keep out, be sure to check out this post. Have you incorporated any of these ideas into your work spaces? I love to hear how people organize! 


Wednesday, September 21, 2016

Everything you need to know about butcher block counters!

Hello my friends! I'm back today with some more details on the DIY desk I made in our new office/craft room upstairs. I got a bunch of questions about the butcher block so I figured this would be a good time to recap how to finish butcher and share how we've used it in our house.

I'll number this info so it's easy to follow the steps of the process! 

1. The question I get asked more than any other when it comes to this material…where to get it? 

I've purchased at two places. IKEA is the easiest and honestly the best quality I've found. I just don't always purchase from there because it's a four hour round trip. :) (Next year we'll have one here in Indy, yay!!) Also, IKEA used to have an island size and I get mixed info on whether or not they still carry it in the Numerar butcher block. 

I've also purchased from a local lumber store called Northwest Lumber. They are more expensive but are maple and come in much larger sizes. They will also cut them down (for a fee). I used their island size for our kitchen and they cut it down and refinished it with a food safe protective treatment. You can also ask for that finish to be sanded off and that's what I did this time. 

Lumber Liquidators also carries butcher block. They don't typically have any of the island countertops in stock so you'll have to wait for those to come in, but if you are just looking at perimeter countertops in a kitchen or something on a built in, they would be a good option. I can't attest to the quality but the pricing is similar to IKEA. 

Bottom line -- if you are not near one of the stores that carries butcher, do some searching for lumber companies near you. I bet you'll be able to find it! (But it will probably cost more.)

2. No matter what you plan to do with your butcher block, the first step is to sand it. Every piece I bring home I sand, even if it's been done already. You don't have to go crazy with it -- just a light sanding with a fine grit is fine. You just want to even out the wood for whatever finish you'll use. 

Be sure to wipe it down with a tack cloth or a wet rag -- if you use a wet cloth it will open up the wood  even more to accept stain. (Just be sure to get all areas or it may look different in spots when you stain.)

3. This is a step I used to skip and I've now learned how important it is. If you are going to STAIN, use a pre-stain conditioner first: 


I never used it before because I thought it would slow the process down, and that's not true at all. It takes mere minutes to spread it on and you just leave it. You can stain immediately! It helps to even everything out and prevents blotchy spots. 

4. There are a few options when it comes to finishing butcher block and those depend on your design preference. You can leave it natural and put a polyurethane on it (more on that in a minute), you can stain or you can enhance the natural wood with Tung oil: 

When I first installed butcher block I was concerned about using anything on it that wasn't food safe. I've since realized unless you are literally eating off of the countertop, you are OK to use a stain and poly. But I did love the natural look and it was a nice contrast to our dark floors. 

This is the Tung oil I use: 

Remember if you want a high gloss finish to pick accordingly. I share how to apply it here -- it's very easy! You just need a soft cloth to put it on.  

It really enhances the tones in the wood and protects it from liquids and most stains. Every year or so I would sand down the island and reapply the Tung oil, so there is a bit of upkeep with this. Here's how this finish looks with IKEA butcher block: 

Can you believe how different our kitchen looks? Here's our new countertop (and island) with the larger butcher from our local lumber yard: 

If you want a stained look, that's easy too. :) None of this is hard, it's just time consuming! I used dark walnut by Minwax on the large desk in the loft: 

I love this stain and it is the color I use most on projects around the house. It's a beautiful dark brown with no red undertones: 
Follow the instructions on the can for the application -- there are two things to keep in mind when staining. Keep a "wet edge"while applying, meaning don't walk away from your project in the process. Don't let the stain dry in sections and then start up another one. Make sure you have time to stain the entire piece at one time. 

Also, it is really important to let the stain dry and cure the recommended time in between coats. It will become gummy and won't dry well if you rush it. 

4. After your stain has dried you need to protect it, especially if you will using the piece. I don't always add a polyurethane coat -- like on our wood wall in the basement: 

We don't use this sink a ton and even when water has splashed on it it's been fine. But overall, especially for countertops of any kind, you'll need to add a few coats of poly. 

I use this fast-drying version and love it: 


This version speeds up the process a bit because you can reapply quicker.

I use cheap foam brushes to apply both stain and polyurethane. They allow for a smooth application and I can just toss them afterwards: 

Here's how the wood stain and poly looks on our kitchen shelves

If you don't add that protective coat they will be very hard to clean and will not be protected against liquids. Blocking liquid is the most important aspect of having butcher block in your kitchen. There are a few different options for countertops so if you are considering them near a sink be sure to research the best protective coating. 

5. Final sanding -- my latest trick! 

So when I was finished with the desk in the craft room it still had a slightly rough texture that was bugging me. This is not typical -- usually it's super smooth. I think I must have jostled the poly around too much before I used it because it was just not the finish I was used to. 

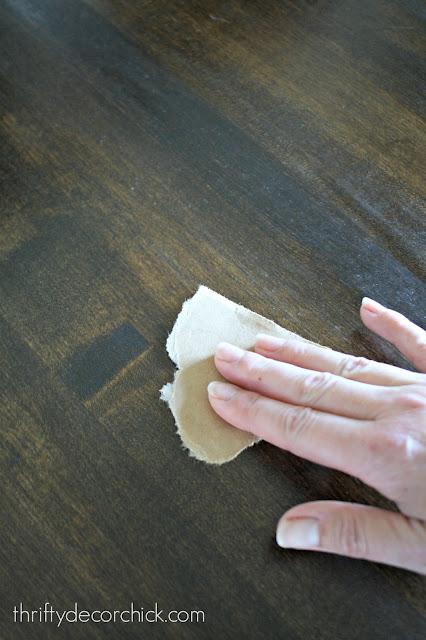
I didn't want to use sandpaper on it because it can change the look of the wood and make it slightly cloudy. I could have tried steel wool but was nervous it would do the same. I remembered I trick I had heard about years ago and decided to try it out. 

I couldn't even believe how well it worked!: 

It was a paper bag! Can you believe it? Maybe you know of this awesome trick but I was so surprised with the results. I just used a little piece of the bag and it worked for the whole desk. You just rub it over the surface and it knocks down those tiny imperfections that make it feel rough. 

Isn't that awesome? I don't know how well it work work between coats but for a final touch it was perfect. It left the finish looking exactly the same -- no cloudiness at all. 

Here's a closer look at the finished product: 

They are easy to clean and look great!

Using an island countertop size allowed me to create a massive double-sided desk. We LOVE it: 

I'll link to a few more of my favorite butcher block projects below! Have you used them in your home or kitchen? I think adding them to an island is a perfect mix -- you don't have to worry about the area near the sink but you still get the warmth of the wood. 

Have you tried the paper bag trick for sanding? 


Some affiliate links included for your convenience! 

See how I made and stained a farmhouse table here: 


I used a section of IKEA butcher block, cut straight down the middle, to make the counters for the DIY built ins

Butcher block was the perfect top to the DIY mud room bench


SaveSave
SaveSaveSaveSave
SaveSave