Wednesday, April 12, 2017

How to make a DIY wrapping paper station (for cheap!)

Hey there! We've had a busy week soaking up some summer activities…our time off is coming to a close soon. This week alone we visited the Indy Children's Museum, explored downtown, saw a movie and took a trip to Kings Island. Such a blast but I'm ready to relax a bit today! (If you are interested in visiting our fun city, check out this post and this one for my tips and our favorite places.) 

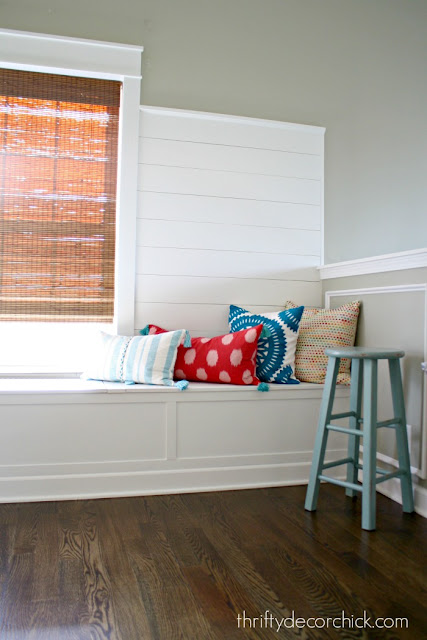
I'm back today with a quick and easy project that I finished up in the loft last week. I'm pretty excited about it! Last time I shared this space I had this empty space above the window seat
window seat with pillows

I've known all along exactly what I wanted to put there -- a gift wrap station. :) I'm all about form and function and I knew this would be cute and serve a purpose in this space. 

I hardly spent anything on this because I used old trim from this room for the frame. You can definitely put this directly on the wall but I wanted to make a little bit more of a statement and I had the trim anyway. 

I had plenty of wall space but didn't want it to go too low -- that corner is already my favorite spot on the window seat and I didn't want to worry about hitting my head. :) Turns out you can fit quite a few rolls in a small space. I ended up with 24 inches tall by about 34 wide: 
how to make a wrapping paper holder

Most gift wrap is 30 inches wide but Christmas wrapping is sometimes wider so that will just depend on your needs. 

I nailed the trim directly on the planks and then cleaned it up -- putty for the corners and holes and a couple coats of semi gloss paint: 
wrapping paper station on wall

The next part was super easy. I picked up some dowel rods in the 3/8 size (again, any size will do, just make sure they don't bow with the weight of the paper): 
dowel rods for wrapping paper holder

And a couple packages of gold cup hooks
hooks for wrapping paper

Make sure your rods will fit in the hooks! Mine were 7/8 inches so it worked perfect. 

I did some trial and error to decide on the layout -- I knew I wanted six up there so I measured out every 3.5 inches. I held my measuring tape up and marked those distances down the length of the trim, making sure each one was in the middle: 
how to make your own wrapping paper station

Make sure you do the exact same measurements on the other side. Then you've got yourself a super cute display that functions great as well: 
wrapping paper storage for wall

OH I just love it!! So cute! Of course I got it up and decided I needed a few new rolls of paper to make it even cuter. :) I couldn't resist. 

I love the pops of color against the white wall. I'm starting to love how everything kind of "sings" against white. I don't think all white would ever happen in our house but I can tell I'm going to like it in this space: 
DIY wrapping paper storage

To access the paper I can either pull the wrapping out from the wall and cut it where it is, or it's easy to take them down. I will probably just take them down when I need them. 

All in all this was only a $10 project since I had the trim, and as I mentioned, that's optional anyway. 
DIY wrapping paper holder

Not gonna lie, I'm already thinking about how cute it will look with Christmas paper! :) 

There you go -- a simple, inexpensive project that you can adjust to your needs. I absolutely love mine and am happy I was able to put that space to use. 

Have a great weekend my friends! :) 

Affiliate links included for your convenience!


Saturday, March 18, 2017

Get 15% off at THE POSTER CLUB!

Heads up! There's a new print in town. Two actually! Following up on the great success with their latest collections of art prints, Copenhagen-based design studio Atelier CPH has launched two new abstract art prints. Abstract construction and Abstract cubism will be available as part of new 'THE POSTER CLUB collection' - a series of art prints made exclusively for THE POSTER CLUB by various designers, artists and photographers - and come in 30 cm x 40 cm and 50 cm x 70 cm. Love to have one in your own home? Exciting news! The prints are available worldwide and you can get 15% off by simply typing in code myscandinavianhome15 at checkout until 31st March! In fact, this code applies to all posters in the online store- time to snap up a print by Coco Lapine, Playtype and Silke Bonde too?!


 Photography by Morten Bentzon

How fab! I particularly like the Abstract Construction (in a light wood frame). Do you have a favourite? Any others you have your eye on?

You can find out more about the collaboration here and shop posters until your hearts content here.

Have a wonderful weekend!

This post was brought to you in collaboration with THE POSTER CLUB - who do indeed sell some of the finest posters out there (and that, as with all other words in this post, comes from my heart!). Thank you for supporting the brands that make My Scandinavian Home blog possible.

Sunday, March 5, 2017

I've been framed!

The saying goes that "you are only as good as the company you keep". Well I must be pretty amazing based on the excellent company I keep! And, luckily for you, I'm going to introduce you to two of these talented friends.

The first is Sonette Wilson of FrameWorx. Sonette runs her framing business from her home based in in Cape Town's southern suburbs. She is one of those people who has the kind of effortless style that we all hanker after and her good taste extends to her framing skills. She will listen to what you think you would like, while at the same time making suggestions of her own that you will soon realise are far better than what you had in mind! She recently framed my protea painting in a simple white box frame and I couldn't be happier. 


It has brought the painting to life and given it a finished look that was previously lacking.


She has a range of frames, both plain and ornate, depending on your needs. 


Here a white frame and white mounting allow the painting to do all the talking.


She also does fabulous mirrors as in the example below....


.....and is often asked to frame memorabilia or special items for clients. Here she has framed a little statue of Ganesh, the Hindu God of Good Fortune. 


She recently framed a painting done by an artist friend of mine who I am also going to introduce to you. 
The process....


...and the beautiful end result!


So please contact Sonette for all your framing needs via her Facebook page

The painting above was done by my most talented friend, Trish Mitchell. I actually met Trish at art class and we clicked instantly. We love many of the same things and she is also a  Francophile, which instantly elevates her in my book! Trish has been painting for many years but has only recently decided to turn "professional". Long overdue IMHO! 

She has the most wonderful eye for colour and beauty and has a particular love for painting flowers....


...but can turn her hand to anything really, from people....


...to still lives...


...to landscapes...


...and wildlife!


 Her artworks are real works of art! Trish has a website here and a blog here

So I have made it really easy for you, just contact Trish to aquire one of her beautiful oil paintings and then get in touch with Sonette for your framing and you are all sorted!

You're welcome!

Till next time

Sharon x


Friday, February 24, 2017

Changing up our gallery wall art (for free!)

Well hello and welcome back to our regularly scheduled programming! Time to get into the swing of things again! 

I LOVE our house after all the Christmas decor is taken down -- I'm always sad to see it go but I'm obsessed with how bright and big the house feels. It's just right for this time of year!

I always have this itch to move furniture around in the new year too, but our house is set up in such a way that it's really not possible in most rooms. It's a very open floor plan so most of our furniture only works in certain configurations. 

So instead, I usually look into smaller changes -- and those can make a big impact too! I've had these frames in our living room for years:
scrapbook paper as art

And since I hung them I've wanted to fill them with some kind of botanical print. I let them sit empty for a long time and finally just ended up sticking some scrapbook paper inside. It was a good (and cheap!) placeholder but not what I wanted. 

This ended up being a quick project, but it took me a long time (obviously) to find the prints I wanted. It was hard to find enough -- I wanted either at least five (that I could use twice) or ten. And they all had to have a similar feel. I wanted a little bit of color but not a ton. I found some fern printables that I plan to use elsewhere but they were a little too plain for this spot. 

After looking for some time I found these Audubon scans over at Bless'er House
Free Audubon art printables

And they were perfect! (You'll have to enter an email to download these.)

I talk about free printables a lot during the holidays but they area also such a great, cheap way to add some art around the house. I shared how to use one of the greatest databases for free art here. (I used some for art in our family room.) AND I gathered a list of (pretty much) free art sources and ideas too. 

Saving them to your computer is different for each site, but once you get them downloaded they are easy to print out. I took some screen shots of my computer to show you how I do this. I use Word and open a new file: 
How to print printables at home

Then go to the upper right (see above) and click "picture from file" -- grab your image: 

How to download and print free art

Then it will appear in your document:
How to download free art

Make sure to center it using the position option:
How to print free printables

And then you can make it as big as you'd like. You need to keep in mind the file size of your art -- if you make it too big it will get blurry. But most are fine for an 8x10 size: 
How to print free printables at home

I use our home printer (I cannot tell you how much I LOVE this HP printer I shared in November -- it is a tiny little printer but prints better than any of the bigger ones we've had!). I print them off on white linen-look card stock from the craft store. You can get the paper at Hobby Lobby for half off so even for ten I think I paid less than $3. 

You can also just use regular printer paper -- I've definitely done that. The paper I like to use is just a slightly nicer look when you get close. I'm sure there's an easier way to print these out but this is how I do it. I have simple printer downloads that I use for photos, but I like that this gives me more control over the size of the image. 

As soon as I finished them up I was thrilled: 
Symmetrical gallery wall with free prints


They are so much brighter and prettier in these frames! It was such a little thing but it felt like a big change in here: 
Large symmetrical gallery wall

I'm all about making rooms feel more open and lighter this time of year and these do just that. The scrapbook paper worked fine too -- these are just the look I've always wanted in here. 

There were six available so I used five and printed out two of each. These combine the botanical look with the birds...I'm really happy with them:
Free Audubon art prints

If you have a large space to fill with a lot of prints you can find Audubon and botanical books online for just this purpose. This one looks like a great option for botanical prints and has great reviews (look in the comments for photos).  And this one has more of the look I have with birds and branches. But if you have a smaller grouping like me you can just do a Google search or look on Pinterest like I did. You'll have access to a TON of free options!

While I was making that small change I went ahead with another one I'd been considering. We've had this rectangle frame in the foyer for a long time: 
Foyer decor ideas

I've wanted to change it out to a round mirror to soften up this space. There are a lot of hard angles between this, the console and the large art I have near the stairs next to it. It's always felt to clunky but I've been waiting to find the right piece. 

So I was thinking...I've had two of these large IKEA mirrors for a bathroom redo I'd like to start this year (although I doubt it will happen) but wanted to see how one would look here -- and I loved it: 
Round mirror over console table

I LOVE the wood tone with the color of the console table! And the simple design works beautifully with the busier design on the table too. 

SO. much. better: 
Round mirror in foyer

Only thing is, when we tackle the bathroom reno I may have to go get another mirror. ;) Oh well. For now it felt like a free upgrade! It definitely satisfied my urge to change things up and I love how it looks. 

I mentioned in my last post that I'm going through some ideas in my head to address the walls in this room because they go up so high. It's something I hope to get to this year but I have to get my final vision settled first. :) AND that tile is the one I mentioned in that post as well...it's going this year if it's the only thing I do! Ha!

Have you used these free options for art in your home? It takes a few minutes and a decent printer (or you can send them out) and it's so worth it! 

Affiliate links included for your convenience! 


Thursday, February 16, 2017

Chalkboard wall and open shelving in the basement!

I finally got back into the DIY groove again and it feels great! I usually take a minute (or a month. Two.) and give myself a break over the holiday and new year. But when I'm ready to go back at it...I'm ready! 

I wanted to get this project done back before December, but you know how that goes. I was excited to tackle it and yet again was thrilled to work with Minwax on this because I love their products. LOVE! I'm soooo happy with how this came together. It's just like my vision looked in my head. 

We started with a blank wall where our boy's basketball hoop used to be: 
patching holes in wall

You can see that after years of it hanging there it started to dig into the drywall from numerous dunks.  ðŸ˜‰ 

I showed you how we reconfigured the kitchenette in our basement so this area that used to be open below now has cabinets and a wine fridge. 

My first step was to patch those holes. The smaller ones I fixed using this method. The bigger stuff I filled in with putty. Not gonna lie, the final result wasn't perfect because I knew it would be hard to see later anyway. And because I can be crazy impatient. 

But I got them filled and while I waited on the compound to dry, I started marking off where I wanted my lines on the wall: 
How to tape off lines on wall

You can use a laser level for long straight lines, but for a smaller area I prefer a regular level. Just mark your lines with pencil and then you can tape off using that as a guide. 

Our walls are pretty flat so it's not too hard to get a straight line, but I always make sure to push the tape down as much as possible. A flat edge helps a ton:
Making sure painters tape doesn't bleed

I started my four coats of chalkboard paint and because I didn't want to run to the hardware store, I improvised with my paint tray: 
DIY paint tray hack

I do this quite often. :) I grabbed a box that was going to recycling, put a plastic grocery bag over it (make sure any print goes on the opposite side!) and poured my paint in. Works every time. 

After four coats I was able to peel the tape off -- my favorite part -- and look at those lines!:
How to get crisp paint lines

Beautiful! ;) 

While the paint was drying in between coats I started on the wood shelving. The wood was the only thing I had to buy for this project because I had the rest of the materials. I love cheap projects! 

One thing that is helpful when you stain, that I don't think I've told you about, is to open up the wood by wiping it down with a wet rag: 
Popping wood grain with water

This is called "popping" the grain and it allows the stain to really get into the pores of the wood.

I talk a lot about the Minwax prestain conditioner and how important that is too -- I think it's similar to what water does, but the conditioner also helps to even out the wood before staining too:  
Minwax prestain conditioner before staining

You can stain immediately after using the conditioner and it's really easy to apply, so it doesn't take more than a few minutes. 

I went with one of my favorite Minwax stains for this project, Provincial
Minwax Provincial

And with Beauty and the Beast coming out soon, I immediately start singing Belle's song every time I see it. (Cannot wait to see that!) 

I usually use a foam brush for my conditioner, stain and poly application but we were out and again...I didn't want to go anywhere. I didn't want use a good paint brush so I went with a rag, which is always a good option as well:
Staining with a rag

If you use a rag I highly recommend wearing gloves! 

When the stain had dried (I did this project over a few days to allow dry time for the chalkboard paint and stain) I was able to put a coat of polyurethane on: 
Fast drying Minwax polyurethane

I love the Minwax fast drying poly because it really does allow you to move on much faster. Again, I applied it with the rag:
How to apply polyurethane

I love poly because it really brings out the beauty of the stain. 

While that dried I seasoned the chalkboard -- I keep hearing you need to do this and I always have with my boards, but I don't really know if it's helpful or not: 
Seasoning a chalkboard

You just rub the chalk on there sideways and cover the board. It's supposed to make it easier to erase later but who knows. I do it because it just takes a few minutes and I like that it leaves a slightly cloudy, "used" look to the board. 

I hung my shelves with the IKEA Ekby Bjarnum brackets that I had from years ago:
Ikea Ekby Bjarnum shelf brackets

If you use these brackets -- attach them to the ends of your wood first...then hang. Last time I hung one bracket and then put the wood inside and hung the other. WAY more work that way. This time I just put the shelf up against the wall, made sure it was level and then marked my holes for anchors. So much faster!!

I grabbed stuff that we've had in a tray on the counter and started styling. I only purchased the little wood box and a small cutting board -- the rest we had and that's always nice!:
Wood shelves on black wall

We USE most everything on the shelves that that's a bonus too. ;) 

I LOVE how the shelves look against the dark wall!!: 
Wood shelves on black chalkboard wall

I told you here how I think every room needs some black in it and every time I use it I'm reminded of that. I just love the contrast. 

I never wanted to put upper cabinets on these walls because we just don't need that much storage down here. And in our basement with eight foot ceilings I wanted to keep everything as open as possible. It took me awhile to figure out what I wanted to do with this wall because I didn't want to compete (or duplicate) the wood wall I did last year next to it: 
Chalkboard wall with shelving

I shared this photo years ago from Magnolia Homes and it was my inspiration for this project: 
Fixer Upper chalkboard wall

I haven't added anything on the chalkboard yet but we will. I think it will be a fun spot to play around with for parties and holidays. :) 

Next I need to trim out and paint the rest of the cabinets. It shouldn't be TOO bad -- there's really only a few small cabinet doors and then two sides. 

We have a toaster oven and microwave to put out here too, but I'm loving the counters so clean!:
Kitchenette with wood shelves

Chalkboard wall with wood shelves

Here's a better view of the whole thing as it is now. I want to start painting this week and get this whole thing wrapped up!: 
Industrial kitchenette with wood tones

Kitchenette with wood and chalkboard walls

If you have any questions about anything I used, please let me know! This was a simple project that really didn't take long -- the dry time is what you have to wait on. :) 

Here are some more projects from this spot over the years if you'd like to check them out: 

How to stencil a wall

Affordable DIY wood planked wall
Wood planked wall (for cheap!)

Basement kitchenette layout