Wednesday, April 12, 2017

How to make a DIY wrapping paper station (for cheap!)

Hey there! We've had a busy week soaking up some summer activities…our time off is coming to a close soon. This week alone we visited the Indy Children's Museum, explored downtown, saw a movie and took a trip to Kings Island. Such a blast but I'm ready to relax a bit today! (If you are interested in visiting our fun city, check out this post and this one for my tips and our favorite places.) 

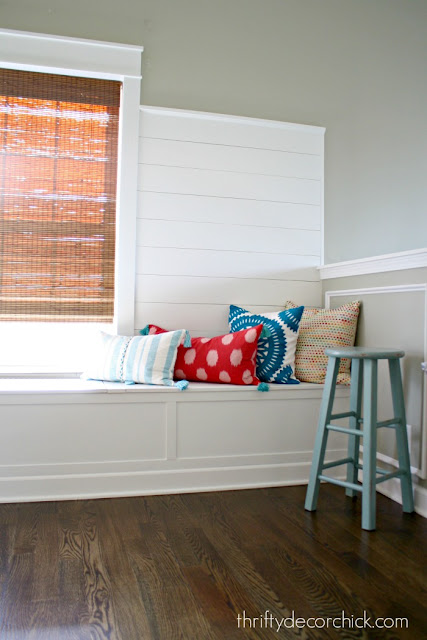
I'm back today with a quick and easy project that I finished up in the loft last week. I'm pretty excited about it! Last time I shared this space I had this empty space above the window seat
window seat with pillows

I've known all along exactly what I wanted to put there -- a gift wrap station. :) I'm all about form and function and I knew this would be cute and serve a purpose in this space. 

I hardly spent anything on this because I used old trim from this room for the frame. You can definitely put this directly on the wall but I wanted to make a little bit more of a statement and I had the trim anyway. 

I had plenty of wall space but didn't want it to go too low -- that corner is already my favorite spot on the window seat and I didn't want to worry about hitting my head. :) Turns out you can fit quite a few rolls in a small space. I ended up with 24 inches tall by about 34 wide: 
how to make a wrapping paper holder

Most gift wrap is 30 inches wide but Christmas wrapping is sometimes wider so that will just depend on your needs. 

I nailed the trim directly on the planks and then cleaned it up -- putty for the corners and holes and a couple coats of semi gloss paint: 
wrapping paper station on wall

The next part was super easy. I picked up some dowel rods in the 3/8 size (again, any size will do, just make sure they don't bow with the weight of the paper): 
dowel rods for wrapping paper holder

And a couple packages of gold cup hooks
hooks for wrapping paper

Make sure your rods will fit in the hooks! Mine were 7/8 inches so it worked perfect. 

I did some trial and error to decide on the layout -- I knew I wanted six up there so I measured out every 3.5 inches. I held my measuring tape up and marked those distances down the length of the trim, making sure each one was in the middle: 
how to make your own wrapping paper station

Make sure you do the exact same measurements on the other side. Then you've got yourself a super cute display that functions great as well: 
wrapping paper storage for wall

OH I just love it!! So cute! Of course I got it up and decided I needed a few new rolls of paper to make it even cuter. :) I couldn't resist. 

I love the pops of color against the white wall. I'm starting to love how everything kind of "sings" against white. I don't think all white would ever happen in our house but I can tell I'm going to like it in this space: 
DIY wrapping paper storage

To access the paper I can either pull the wrapping out from the wall and cut it where it is, or it's easy to take them down. I will probably just take them down when I need them. 

All in all this was only a $10 project since I had the trim, and as I mentioned, that's optional anyway. 
DIY wrapping paper holder

Not gonna lie, I'm already thinking about how cute it will look with Christmas paper! :) 

There you go -- a simple, inexpensive project that you can adjust to your needs. I absolutely love mine and am happy I was able to put that space to use. 

Have a great weekend my friends! :) 

Affiliate links included for your convenience!


Thursday, February 9, 2017

My first wood burning project!

So I've used a LOT of tools over the years and feel comfortable with all of them. But I still get intimidated when I use a new one! (The tile saw made me sweat the first time, till I realized how easy it was to use!) If someone is interested in learning how to use a new tool I tell them to do two things -- do a ton of research (blogs are a GREAT resource 😉) and take your time and "get to know" the tool before you use it. 

When I'm trying something for the first time I take my time unboxing it and putting it tougher, and read all of the paperwork that comes with it. This helps to ease me into it and makes me feel more comfortable. I also look up videos to see how people use the tool. 

Recently the folks at Dremel asked me to share a DIY project using their Dremel Maker Kit and I was honored they asked...but nervous to try something new!:
Dremel maker kit review for burning and cutting wood

I laugh when I think about that because I feel totally comfortable using my huge compound miter saw but these little Dremel tools were intimidating me. I think it happens to everyone -- and I think it's a good thing because you don't want be overly confident when you use a tool for the first time.

This maker kit comes with three tools -- the Dremel 200 rotary tool, which can be used for a variety of DIY projects. The Dremel engraver is for engraving stone, metal and wood. And the VersaTip soldering torch, which I was most excited about, is for burning into wood, soldering or cutting: 
Dremel three piece tool set

I had a project in mind and I knew either the engraver or the VersaTip would work:
Dremel tool kits

I worked in the garage on a large scrap piece of wood and started trying them out (after reading all the materials on operation). 

I tried the engraver first and it was so cool and incredibly easy to use: 
Dremel engraving tool

I knew right away this wasn't the look I wanted but I am thinking of ways I can use this one on metal or glass in the future. 

I really wanted to give this project a burned look so I decided to try the VersaTip instead. You need to fill the tool with butane -- we already had some for filling our candle lighters. You flip the tool upside down and then press the butane nozzle into it. It only takes a few seconds to fill it up -- you'll feel the canister getting cold: 
Butane Dremel wood burner

You need to let the butane warm up a bit and then it's ready to use! 

It was incredibly easy to operate -- there's a safety switch but once you flip that up it's just like a lighter. You'll hear the torch start burning and you'll see it as well: 
Dremel VersaTip for wood burning crafts

You can smell the butane a bit -- that's another reason you may want to try this project outside. It's not overpowering by any means. This tool comes with a bunch of tips for different projects -- from cutting to soldering to burning. I found this one above to be the easiest for this project. 

On a side note -- I was thrilled to learn that I can use this tool for caramelizing foods as well. I've always wanted to try making creme brûlée at home and now I can! :) 

Once I was comfortable with using the tool, I printed out what I wanted to burn into the wood. A friend of ours is getting married later this year and I thought this would be a cute addition to their gift. I LOVE adding a handmade or personal gift for weddings or baby showers and used to do it a lot. I'm trying to get back to that. :) 

I found a package of wood slices at Michael's for this project and taped the image onto the wood: 
Burning wood with Dremel tool

Then I traced the letters with a pen to transfer the image to the wood like I showed you how to do here

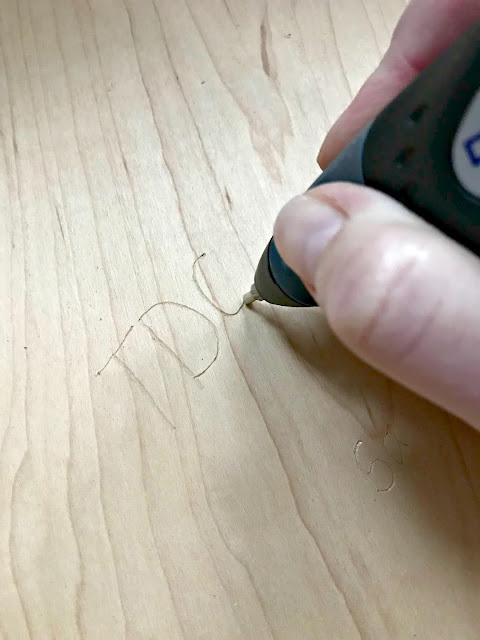
On some of them I found it was helpful to trace the imprint with a pen before I started with the tool. I took the paper off (don't leave it on there with a flame!) and started burning the shapes into the wood:
Wedding gift wood coasters

This is not a quick project -- you'll want to take your time and be methodical about it. I started with a lighter hand to get my shape and would go back over it to get the darker burnt look. 

I think they turned out SO cute. I'm kind of in love with them. In my head I made these planning to gift them as coasters so I added a couple layers of wipe on polyurethane:
DIY wedding gift/craft

But really, they could be used in so many ways!

I added some felt stickers to the bottom of each one so they don't scratch: 
DIY wood slice coasters

I tried to do wedding-type images -- their initials, the heart (like one you would see carved into a tree) and the Roman numeral for the day they're getting married and the year: 
DIY wood slice wood burning craft
I think they'll make great coasters! But they could be used in so many other ways too -- I could see them as super cute ornaments if they decide to drill a hole into the top of each one. I also think they'd be fun as art in a shadow box or placed on top of a black background in a frame. They could also be used as small trivets for dishes -- there are so many uses!

I just think they're plain cute and I smile when I see them. The bride and groom are a fun young couple and I hope they'll enjoy them too: 
Wood burning craft/gift with wood slices

I'm so glad I tried this tool and got over being intimidated by something new. Of course after I used it I realized how easy it was! We have a Dremel cutting tool that I've used in the past but this set is more for precision crafts and items where you want to add more detail. I highly recommend it if you are interested in doing those types of projects. 

Have you tried this tool for any crafts or DIY projects? I though it was fun and it wasn't nearly as intimidating to use as I thought it would be. I felt comfortable with it within minutes of trying it out and burning the wood was fun. My mind is swimming with ideas for future projects! Now I'm off to make creme brûlée! ;) 


Monday, February 6, 2017

Pretty DIY centerpieces and tablescapes perfect for spring!

Hello all! Goodness I'm ready for Friday this week! The sun is out, the house is fairly clean (although picked up and clean are two very different things) and I'm ready to relax for a couple days. We're supposed to get snow tomorrow but Sunday looks promising for good, warmer weather! 

I'm in the spring mood so I'm sharing some BEAUTIFUL spring-inspired tablescapes and centerpieces today. I shared our simple green centerpiece earlier this week and it got me thinking about spring/Easter tables. 

Enjoy the pretty inspiration! You can find the link to the talented bloggers under each photo. 

This is just plain stunning. The gold combo with the peach and pink is lovely:  
Pretty spring tablescape with gold, pink and peach

I love these simple farmhouse centerpiece ideas -- the simple box with flowers is so easy for spring: 
Farmhouse spring centerpieces

Table runners are an easy way to add color and texture to your table -- this painted DIY runner is perfect if you have a long table (it's hard to find long runners in the store!):
DIY painted long runner for table

This burlap and lace runner is a simple DIY and would be so pretty for a spring table:
DIY burlap and lace table runner

If you like more COLOR on your table you'll love these next few. These glittered candlesticks are such a cute idea! I love the idea of green, pink and blue for spring:
Pretty DIY glitter candlesticks

I love the darker feel and deeper colors of this centerpiece:
Dark dining room centerpiece

And the bright pink and green combo in this dining room is gorgeous for spring!
Green and pink spring tablescape ideas

This one is just beautiful -- and easier than you'd think. She shares how to get this distressed look on a mason jar:
Painted mason jar centerpiece

And finally, some pretty ideas for my neutral lovers! I LOVE the moss down the middle of this table! I have a thing for moss and the natural touch it brings -- and it looks great with color or neutrals: 
Pretty natural spring tablescape with moss

I love the simplicity of the next few. They are easily replicated at home with trays or wood boxes: 
Tool box centerpiece with greenery

You can't go wrong with mason jars in a wood trough. Ever:
Simple box and mason jar centerpiece

And I'm always a sucker for succulents. See what I did there? You can find these half off at craft stores and they'll last forever -- no watering needed:
DIY succulent and candle centerpiece

I love the touches of pink in this one and how they spill out of the box. They look so real!
Easy succulent centerpiece

There you go! Some beautiful inspiration for your spring table! I'm ready, are you? Have a wonderful weekend my friends!

Sunday, February 5, 2017

EASY, inexpensive and beautiful DIY spring wreath!

These are my favorite kinds of projects/posts my friends! Quick DIYs that are easy to replicate and aren't going to break the bank. This one is especially easy! 

I found this tulip wreath and fell. in. LOVE with it: 
Full white and yellow tulip wreath

But the price? Seventy dollars?? 😳 It's gorgeous but I knew I could make my own. 

I gathered my supplies -- this grapevine wreath I had already. I recommend grabbing one when they're on sale (I believe this one was $5 after half off). I love these because they're SO easy to stuff with seasonal items:
Grapevine wreath for spring DIY projects

Then I went to Hobby Lobby because their fake flowers were half off. I grabbed way more than I needed just in case (they're usually half off every other week so I wanted to make sure I had enough): 
Affordable fake tulips

So pretty! 

I used my wire cutting pliers and started cutting the stems off the bunches: 
How to cut fake flowers

Then you just stuff them in! It really is so easy. Just place them where you want. 

I thought it looked pretty with just a couple bunches on there:
How to make your own spring wreath

But I wanted a fuller look so I went with six bunches total: 
DIY large tulip wreath for a fraction of the cost

LOVE it! Mine was $24 and is even bigger than the one online. Score! 

I used six bunches at $4 each. I had the wreath, but as I mentioned, you would easily come in under $30 for a very full and large wreath. If you go with a slightly smaller grapevine wreath you'd be able to make due with fewer flowers too. 

I use a Command hook to hang my wreaths on the glass door. This is what I use and it's made for wet locations. We don't get any of the elements on the door, but I used it just in case. It's stayed up for years and held HEAVY wreaths: 
How to make your own tulip wreath

It's hard to get a photo of the glass door without me in it. ;) You don't want to see me in my comfy pants so here you go: 
DIY white and yellow tulip wreath

SO pretty! I just love it! Mine measures about 24 inches across, bigger in some spots. You can make it bigger or smaller with your placement of the tulips. 

Of course you can use any fake flower or greenery for a wreath like this! I love that I can take them out, keep them for next spring and reuse the wreath for summer. It takes maybe ten minutes to add the flowers in once you've got them cut. 

If you don't want to DIY this wreath these are some BEAUTIFUL options. I'm so ready for spring!:  
Yellow and white tulip wreath Amazon


Yellow and white tulip wreath


Dark and light pink tulip wreath

LOVE the pink!

Light and dark pink tulip wreath


Affiliate links included for your convenience! 

Wednesday, December 21, 2016

Christmas thrift store makeovers

Hey all! Hope you're week has been wonderful! I've been incredibly lazy and it's been amazing. :) I've got a few more errands to run and a ton of wrapping to do over the next few days so it's time to get productive again. 

I have some super quick thrift store makeovers I wanted to share with you that I got at an awesome new store (for my local readers). 

The lovely folks at Mission 27 Resale in Indianapolis contacted me a few months ago and asked me to come out to visit their new location downtown. Mission 27 is run by the Society of St. Vincent de Paul, which is an organization that serves the poor and disadvantaged. I LOVE their mission for this store in particular. The lovely folks that run this organization noticed that the food that was being given out at their food bank wasn't always the healthiest of options (because of the cost). The proceeds from this store go to buying healthy foods for the food bank, among other things. 

ALL of the items in the store are donated and it is HUGE. I have to tell you I've never seen nicer items in a thrift shop! I can't wait to go back when I have more time to shop around. 

I grabbed a few treasures that I made over with spray paint for the holidays! They had a bunch of these stocking holders -- I got rid of ours last year because they were falling apart: 
snowflake stocking holder

Some were in decent shape but some had areas where the finish was coming off: 
sanding metal for spray paint

I just took some sandpaper to those areas and sanded until the finish was smooth and not flaking anymore. 

Then I sprayed with my old go-to spray paint, oil rubbed bronze: 
oil rubbed bronze

They turned out as good as new! You may have noticed them on the new fireplace in the basement
stacked stone fireplace DIY

I ended up moving them upstairs to the family room fireplace
gray fireplace and built ins

I also found this CUTE wood reindeer set: 
modern wood reindeer

I loved their modern shape! I took the old bows off and sanded them down a bit -- they were pretty rough. Because of their rough wood I knew spray paint wouldn't cover well, so I grabbed my favorite red paint for Christmas: 
Santa Red paint

You can't go wrong with Santa Red! :) 

I did a couple coats -- still letting a bit of the wood grain come through: 
wood red reindeer

I added some bows just to see how they looked but I think I like them without better: 
red wood reindeer

I spent about $15 on the four stocking holders and the reindeer and the makeovers were easy! The deer are my favorite because they are so unique and fun. :) 

This isn't your regular thrift store...check out some of the photos I grabbed from my visit: 
brick and industrial lighting

Currier and Ives set

vintage Christmas tree

industrial store set up

mission 27 resale store

If you live nearby I would give Mission 27 visit -- the location is massive and they have an incredible selection. (Their women's clothing is crazy good.) This location is near Midland Antiques, another favorite of mine, so you could make a day of it! :) 

I plan to be back before Christmas but not making any promises! Depends on how much wrapping I get done. ;) Hope you all have a wonderful and safe end to your week!